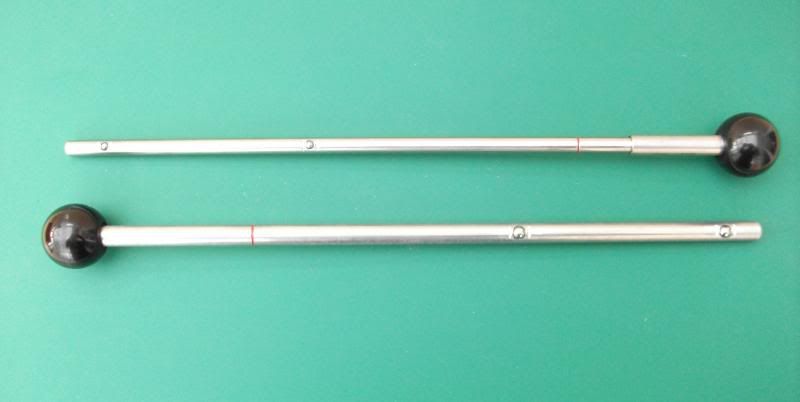
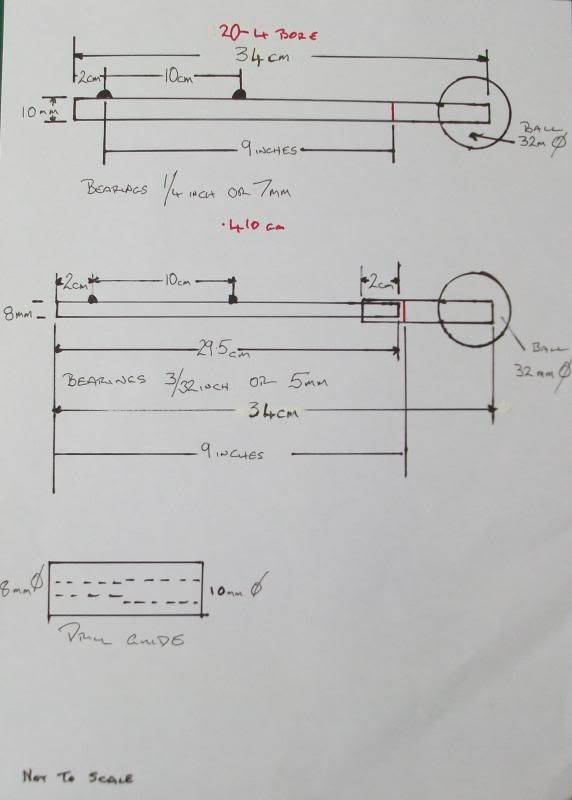
The internal barrel limbs are a part of the gauge that can be a little trying to make but if you read this a few times before you start it should be of help. We will start first with a length of 10mm bar which is for twenty to 4 bore then tackle the .410 version after completing its larger brother should be a little easier to complete. First we have to find the centre of the bar and mark the bearing position, there is an old workshop trick to this that works every time though if you have a well tried method of your own use that. To start clamp the rod horizontally in a vice leaving about some 6 inches sticking out and then run over the top surface with a colourd felt tip pen (well who has �layout� blue these days) try to get a good thick coverage stand at the end of the bar not held in the vice, take hold of a flat file between finger and thumb of each hand with a space between you hands of about 1� inches/40mm place the file on top of the rod in the vice with the thumb and index finger of one hand touching the side of the bar. Now press down on the file and pull the file quickly along the rod towards you and out of the open end. It will leave a shiny straight line on top of the rod for you to measure along. Next hold the bar in a vice with your marked line uppermost and mark the position for each bearing. It is good idea to mark the positions with a firm deep punch mark because you will need to file a small flat on the bar over the marks so when you start to drill the bearing hole the drill will have less tendency to wander, it is the same process for each rod in turn.
We need to drill the holes just a little over half the height of the ball bearings but that is far easier said than done because of the sizes involved. Now because the bearings do not have to rotate they are just set positions along the bar if you over drill the depth it will be fine put some metal packing under each bearing to bring them to the same height. Now to keep things stable until you grip them in the bar a little epoxy adhesive under each bearing with its packing will help greatly. Now my tried and tested method of fixing a ball bearing in a shaft is as follows, using a junior hacksaw make a shallow saw cut about a millimetre deep and about a millimetre from each side of the bearing hole then place a punch in the saw cut angled it towards the bearing and give it a sharp tap with a hammer to swage a piece of metal towards the bearing which will then be griped in its hole.
The smaller gauge limb is inserted in to a piece of 10 mm bar so that it can be clamped in the gauge without a lathe to centre the bar and drill it we have to use an older method once used by clockmakers. Take a piece of steel bar about two inches long and drill half way down its two inch length with a 10mm drill then drill the other half with a 8mm drill and what you will have made is a drilling guide, drilling the 10mm hole first the bottom of the hole shape helps to centre the smaller drill. Sometimes it is a good idea to give the outside of the drilling guide a few smart blows with a hammer all the way around to make it a tighter fit on the 10mm section helping to centre it further. You just fit the guide over the 10mm section and drill through the 8mm hole in the other end not forgetting to remove the drill from the hole from time to time to remove the swarf.