|
S |
M |
T |
W |
T |
F |
S |
|
|
1
|
2
|
3
|
4
|
5
|
6
|
|
7
|
8
|
9
|
10
|
11
|
12
|
13
|
|
14
|
15
|
16
|
17
|
18
|
19
|
20
|
|
21
|
22
|
23
|
24
|
25
|
26
|
27
|
|
28
|
29
|
30
|
|
|
|
|
|
|
2 members (LRF, 1 invisible),
1,034
guests, and
5
robots. |
|
Key:
Admin,
Global Mod,
Mod
|
|
|
Forums10
Topics38,469
Posts545,142
Members14,409
| |
Most Online1,299
Apr 26th, 2024
|
|
|
|
Joined: May 2011
Posts: 1,136 Likes: 37
Sidelock
|

Sidelock
Joined: May 2011
Posts: 1,136 Likes: 37 |
Damascus,
This is exemplary. I am not a machinist but as someone mentioned I can follow instructions and will be making one of these very soon. I expect the only difference in tools is I will use a band saw for some of the cutting.
I do have a question for others. I was trying to copy paste the thread into Word but it didn't work so well. I would like to copy/paste to an app that I can save for later use and make a hard copy to paste above my work bench. Suggestions on how to go about this would be appreciated.
Nothing is foolproof to a sufficiently talented fool.
|
|
|
|
|
Joined: Aug 2006
Posts: 820 Likes: 1
Sidelock
|
|
Sidelock
Joined: Aug 2006
Posts: 820 Likes: 1 |
monty
|
|
|
|
|
Joined: Feb 2006
Posts: 3,728 Likes: 50
Sidelock
|
|
Sidelock
Joined: Feb 2006
Posts: 3,728 Likes: 50 |
Tamid, I am using Windows 8 (not by my choice) and I can copy and paste that article in Word, then give it a title and put it where you want.
David
|
|
|
|
|
Joined: Jan 2013
Posts: 1,124 Likes: 195
Sidelock
|
|
OP
Sidelock
Joined: Jan 2013
Posts: 1,124 Likes: 195 |
How the gauge design works To make things clear about the second ball it is there only to provide a stable platform in a straight line to the reference point ball inside the bore for the gauge to operate correctly, it is also there to prevent rocking because there is no need to hold the gauge once you have inserted it in the barrel this in turn eliminates hand tremble and hold errors because the gauge relies ONLY on gravity to affect a stable reading and its inherent weight also pulls the gauge to the lowest point on the barrels internal curve. The stabilizer/ bearing plays no direct role in measurement at all because all measurements are made strictly between the measuring point ball which is held firmly against the barrels internal surface by gravity acting on the total weight of the gauge, and the measuring ball is the only point directly in line with the dial gauge plunger. Now the distance between the balls is four inches and was found to be the ideal distance by trial and error over many years, less than four inches enabled the gauge to rock easily. Extending the distance between the balls meant that you also needed to extend the gauge�s length and by doing so you started to increase flexing errors If you kept the gauge length the same and still extended the distance between the balls on long chamber guns the stabilizer/bearing could end up positioned in the guns chamber and making a true reading impossible. If you put the gauge into a barrel at this point it will come to rest on the stabilizer/bearing and limb rather than the measuring point and stabilizer/guide bearing purely because of the gauges combined weight past the stabilizing/ bearing balance point thus causing the gauge to act in this manner. This is caused today by the lack of weight and mass of the dial gauge, when I first started this project dial gauge bodies where made from a brass casting weighing in at around 7 ounces which was more than enough to pull the reference point ball into contact with the surface. But today modern dial gauges are made from aluminium and weighing about half the weight of their predecessors, if you feel that you are putting to much weight on the dial gauge you can fit screw on extra weights either side of the external limb by the dial gauge clamp joint especially if you want to use a digital dial gauge. I have also included my very first dial gauge in the completed gauge photograph because it was in at the start of this project though it is now not functioning correctly because of the large amount of internal ware it sustained over some forty years of nearly use and it is now one of my keep for life objects because it was a workshop slave when I was. 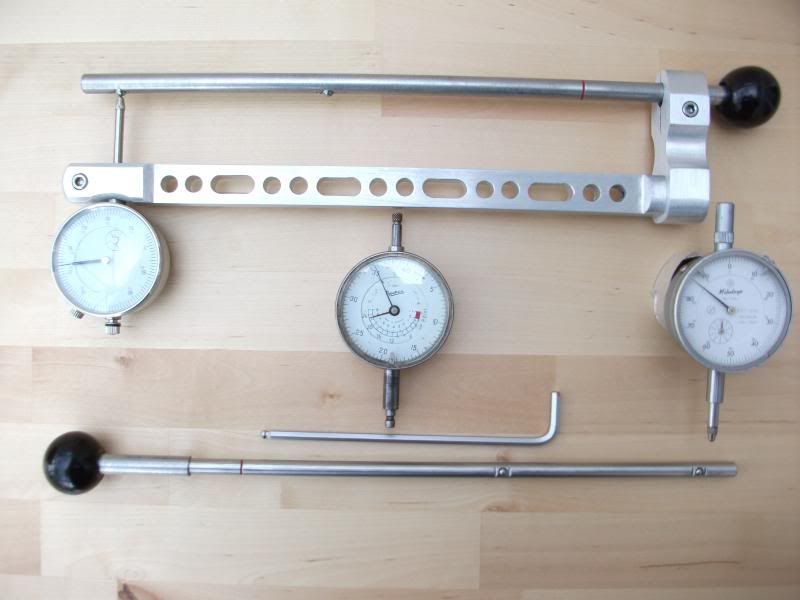 There is a sound reason why I have not included the additional weight in the gauges physical construction to bring the correct balance which is I use different dial gauges in conjunction with the gauge also the gauge�s basic design is so right. One gives Imperial measurement and the other is Metric neither dial gauge weighs the same (the Baty fitted in the gauge weighs 3.5oz and the Mitutoyo weighs 5.5oz) weight or has the same physical dimensions they are manufactured by two different makers this also accounts for the extra shaping of the external limb under the base of dial gauge, so to keep things simple it is far easier to add weight to the dial gauge making replacement far simpler this also makes good sense because it is the only part of the wall thickness gauge liable to break down in some way. Finally talking about dial gauges you could spend a lot of cash and purchase a digital dial gauge but I personally have reservations about them, they seem to weigh next to nothing and are blown of the bench when you sneeze though it also may be just bad luck on my part but my experience of one is that when I need the �D###� thing the battery is flat or when I eventually get around to using it the battery starts to fail so you pays your money and takes your chance it is your decision. To calculate the weight needed to hold the gauges measuring point ball firmly in contact with the barrel�s internal surface the manufactures of dial gauges kindly put a convenient mounting point for the required weight that is always in direct line with the plunger on the back of the gauge. Tie a piece of cotton to the mounting point with a bolt fixed to the other end then add nuts until the gauge comes rest on to the zero point and in doing so the gauge will now be sitting on both zero and stabilizer/bearing points, weigh the bolt and all the nuts then add a minimum of fifty percent more weight and adjust a separate piece of metal to this combined weight and fix to the back of the dial gauge, I like to use silicon rubber it holds well and you can remove the weight from the gauge quite easily. By adding weight to the external limb this also preloads the limb inside the barrel and in doing so reduces further the amount it can flex inside the barrel this is lost important to the .410 version because of its slender design. The lesson all those years ago in the workshop with sitting on the �I� beam was not wasted at all!!!!!!!!!!!!!!!!! I thought at this point I should post some photographs of the gauge in use. Please note the guns are all complete and not striped down and the Gauge enters without a problem on the �side by side, side by side hammer, and the over and under,� though they are all 12 bores in the pictures though I am sure that you can see the way the gauge hangs differing bore sizes will make no difference to the gauges functionality. 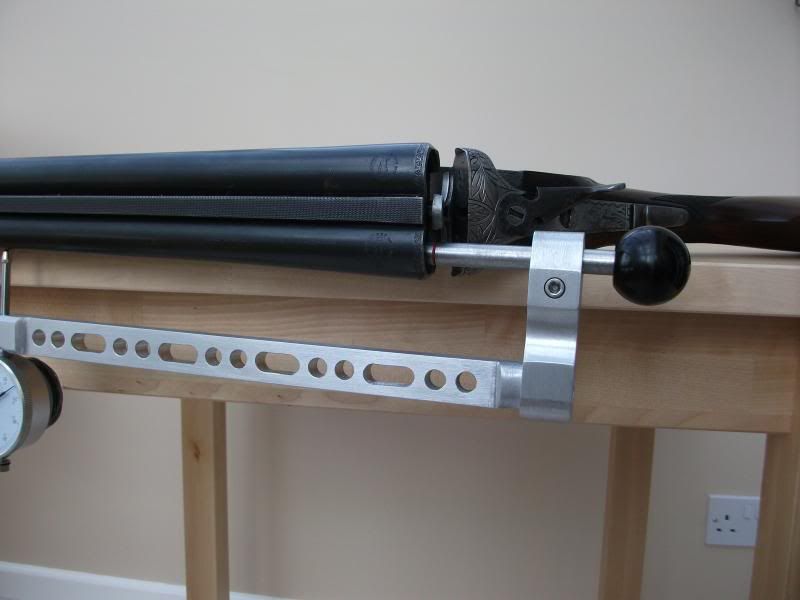 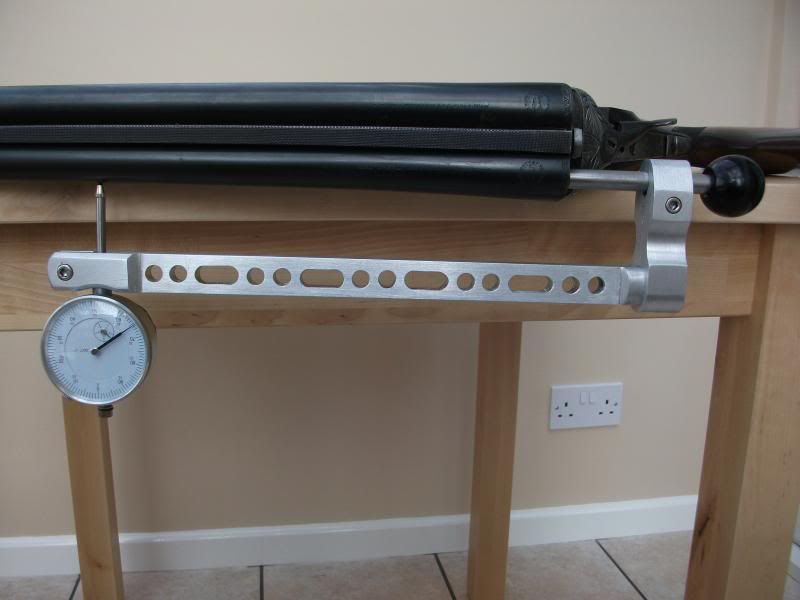 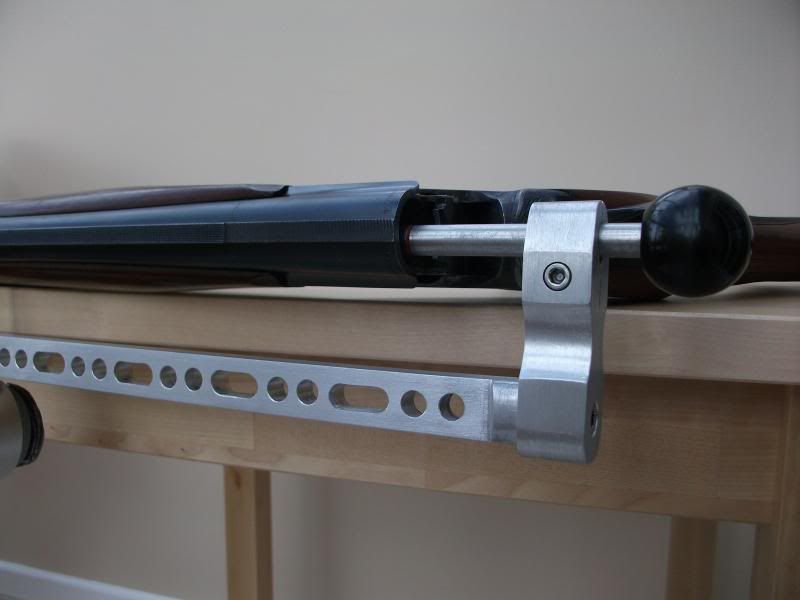  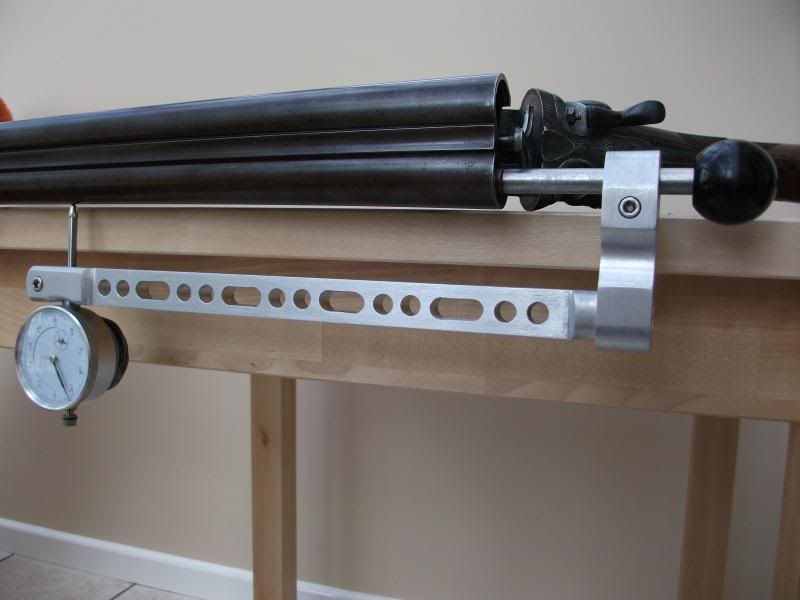 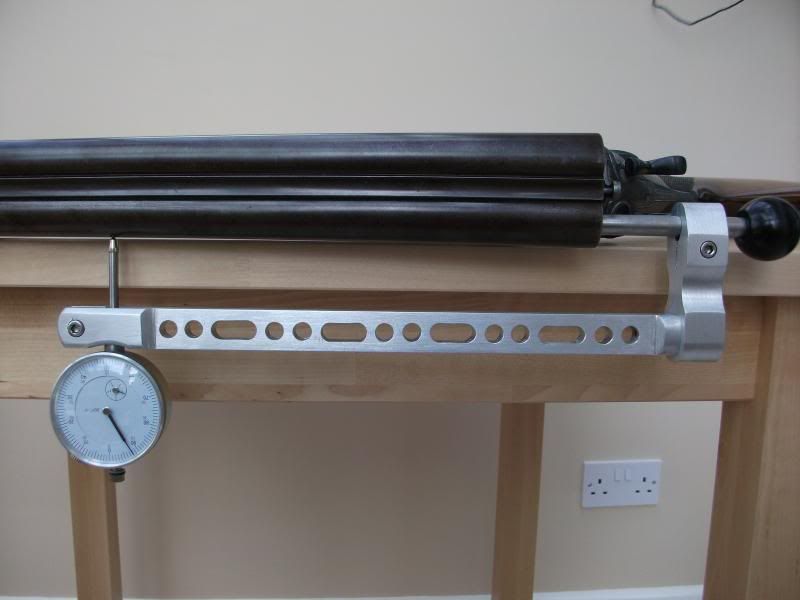 My last posting will be how to zero the gauge but I do feel sure if you have made it this far that you will have guessed by now the how and the why.
The only lessons in my life I truly did learn from where the ones I paid for!
|
|
|
|
|
Joined: Jan 2013
Posts: 1,124 Likes: 195
Sidelock
|
|
OP
Sidelock
Joined: Jan 2013
Posts: 1,124 Likes: 195 |
zeroing the Gauge
Now comes the most important procedure zeroing the gauge, to start align the dial gauge point and its opposite point on the limb that enters the bore there is no reason at this stage to try to zero the gauge. You next suspend the gauge from two fixed points (I use two nails driven into the front face of a shelf) one close to the measuring zero point and one next to the stabilizer/bearing point. This causes the limb that enters the barrel to flex because of the weight of the gauge, it is only now that you can truly zero the gauge by moving the dial indicator closer or further away from the zero point on the limb that enters the barrel. This is the result of that lesson given to me in the workshop by that rather rotund engineer all those years before no matter how strong the object if you apply a weight it will flex. Zeroing the gauge is a bit of a trial especially when using the thinner barrel limb used for the smaller bores but being able to zero the gauge easily will come with a little practice.
To take a reading at all you just push the gauge into the barrel as far as the 9 inch mark and take your hand away gravity will do the rest!
For those who are making this gauge I do hope all goes well. I have been thinking about what to call this effort of mine and I do think a "MARRIOTT GAUGE" should fit the bill.
Good luck Damascus
The only lessons in my life I truly did learn from where the ones I paid for!
|
|
|
|
|
Joined: Feb 2002
Posts: 14,122 Likes: 198
Sidelock
|
|
Sidelock
Joined: Feb 2002
Posts: 14,122 Likes: 198 |
The Marriott gauge is a wonderful effort. However, I am amazed that so many people still think the Manson gauge is hard to use and inaccurate. Some continue to think it cannot be used in the horizontal position. The horizontal position is the simplest and most accurate method by far. Some still think that rod flex is a problem with the Manson. It is not. I have explained in plain language, in past threads, how to use the Manson gauge, yet many seem to ignore the simple instructions, mine, not Brownell's. I guess I could make a video, but it would affect Jon Hosford's business, and I don't want to do that.
|
|
|
|
|
Joined: May 2011
Posts: 1,136 Likes: 37
Sidelock
|
|
Sidelock
Joined: May 2011
Posts: 1,136 Likes: 37 |
Tamid, I am using Windows 8 (not by my choice) and I can copy and paste that article in Word, then give it a title and put it where you want. JDW Thank you for the offer. I opened it at work, flipped the pages to landscape and was able to copy /paste without any cropping. For some reason it wasn't working quite so well with my Mac. Cheers
Nothing is foolproof to a sufficiently talented fool.
|
|
|
|
|
Joined: Feb 2006
Posts: 3,728 Likes: 50
Sidelock
|
|
Sidelock
Joined: Feb 2006
Posts: 3,728 Likes: 50 |
eightbore, the problem I see with both the Hosford and Manson is that in doing the bore readings from the breech, you need someone to hold the barrels down as you try and get readings. Not always possible to get those extra hands and turn for readings.
The flex part is not a problem doing it your way, as the rod is almost floating by holding it with a string or ring.
For home, I will still take the Galazan type gage I made. I can do 10, 12, and 16 ga. If the choke is to tight and I cannot insert it on said rod, I can move it over to the next smaller rod and re-calibrate the needle.
Easy to take readings from top rib to bottom rib and read all from this position and still write down the readings which I do on all guns I do.
The above gage by Damascus from what I see is only a little over 13" long. Good for 26" barrels but would leave a void on longer ones.
David
|
|
|
|
|
Joined: Jan 2013
Posts: 1,124 Likes: 195
Sidelock
|
|
OP
Sidelock
Joined: Jan 2013
Posts: 1,124 Likes: 195 |
Hi all I think after getting to the end of this project I should restate a few things.
The gauges primary function is to check the barrel wall thickness at the �BRITISH STANDARD PROOF DISTANCE OF 9 INCHES FROM THE STANDING BREACH FACE� !!!!!!!!!!!!!
The gauge is not at all intended for checking the total internal barrel length for pitting or flaws, it is an aid in helping you decide how to proceed, firstly you measure the wall thickness at 9 inches and it is lets say it is X thousands of an inch your decision now is how much metal would be left in the barrel walls if the marks or pitting where to be removed and would it be safe to use or sell?
Or how thick are the walls of this gun at 9 inches from the breach face given that there are no marks or pitting in the bore? Depending on the wall thickness is there a high probability it has been back bored to remove pitting or marking?
DO I PURCHASE THIS GUN YES/NO ?
Also the primary design criteria for the gauge was that it could be used without the need to break down a gun to check the barrels independently, and most importantly can I undertake to check the wall thickness of the barrels at 9inches without the help of another person holding the gun.YES! It does that perfectly.
And finally can I put it in a coat pocket? It will also do that for you to!! It is primary purpose in life was to be used at gun sales and auctions to make that decision do I take an interest in this gun or walk past it, there are a plethora of other tools for inspecting gun barrels at leasure in the comfort of your own home or workshop.
Damascus
The only lessons in my life I truly did learn from where the ones I paid for!
|
|
|
|
|
Joined: Jan 2006
Posts: 9,417 Likes: 314
Sidelock
|
|
Sidelock
Joined: Jan 2006
Posts: 9,417 Likes: 314 |
A member here, and SE AZ winter visitor, very kindly made me a gauge. I am NOT mechanically inclined but Gloria a Dios the dang thing is easy to use, and works!! With the .038 curved strip to zero the micrometer  Top to bottom: Upper arm with brass stop Micrometer leg under spring pressure Lower arm with screw to tighten a brass shim (inside the arm) to hold the micrometer in place  24" plastic tool box with 2 bungie cords holding the barrel. It was quite steady with the usual gun cleaning stuff inside, and the cords allowed the barrel to be rotated and ends swapped  Muzzle extending well past the box, with 20" of yardstick  Measuring the wall thickness per the Hosford YouTube http://www.youtube.com/watch?v=1jQZn4kohH4  I started with Fox barrels that Briley honed from .724 to .727, or .0015 from the barrel wall, completely removing what I had thought were fairly deep pits. Measurements were very consistent right/left and the length of the bore: Just past the forcing cone which I had Briley lengthen - .110 9" from the breech - .045 then to .034 the remainder of the bore until the start of the choke constriction. I'm very pleased with the gauge, and owe my friend a nice meal and drinks in Sonoita next winter!!
|
|
|
|
|
