|
S |
M |
T |
W |
T |
F |
S |
|
|
1
|
2
|
3
|
4
|
5
|
6
|
|
7
|
8
|
9
|
10
|
11
|
12
|
13
|
|
14
|
15
|
16
|
17
|
18
|
19
|
20
|
|
21
|
22
|
23
|
24
|
25
|
26
|
27
|
|
28
|
29
|
30
|
|
|
|
|
|
|
1 members (ChiefAmungum),
526
guests, and
4
robots. |
|
Key:
Admin,
Global Mod,
Mod
|
|
|
Forums10
Topics38,465
Posts545,075
Members14,409
| |
Most Online1,258
Mar 29th, 2024
|
|
|
|
Joined: Aug 2018
Posts: 305 Likes: 7
Sidelock
|
OP

Sidelock
Joined: Aug 2018
Posts: 305 Likes: 7 |
These bushings do not have the bronze set screws.
I got the right side bushing off with much effort but did succeed. It was very clean as the prior owner had dunked all but the whole gun is grease.
The left side is giving me fits. I have used all kinds of penetrating oil, a properly fitted and slotted screw driver and copious amounts of torque.
There is no rusting on this gun so I would have a hard time believing this is the only rusted up part.
Any thoughts on removal?
I obviously do not want to destroy the bushing if at all possible.
BTW just a real nice O grade gun. No high grade LC Smiths were hurt or damaged in this episode of Tinkering with ole man LC.
Many thanks
|
|
|
|
|
Joined: Dec 2011
Posts: 908 Likes: 43
Sidelock
|
|
Sidelock
Joined: Dec 2011
Posts: 908 Likes: 43 |
Try heat. They crack through the screw slot, and it's hard to tell till you get it stated out. Good luck.
|
|
|
|
|
Joined: Jul 2012
Posts: 4,463 Likes: 207
Sidelock
|
|
Sidelock
Joined: Jul 2012
Posts: 4,463 Likes: 207 |
I suggest heating with a heavy electric soldering iron, to apply heat mainly to the bushing, apply good penetrant, then tighten the bushing and alternate between tightening and loosening. If that doesn't work, set it up in the drill press to hold the driver firmly in the bushing and turn the driver back and forth with a wrench or visegrips. If that doesn't work, ask someone with more sense than I( shouldn't be hard to find).
Mike
|
|
|
|
|
Joined: Aug 2018
Posts: 305 Likes: 7
Sidelock
|
|
OP
Sidelock
Joined: Aug 2018
Posts: 305 Likes: 7 |
yeah I tried the propane torch and it heats the area around the bushing as well. I am only applying enough to heat to smoke the penetrant so as not to over heat. I think I will heat and cool, heat and cool a few cycles and then get back on the torque.
I am a big guy and don't feel it is even close to moving yet.
BTW a modified small pair of channel locks works great at cocking/uncocking the hammers on the removed side locks.
|
|
|
|
|
Joined: Aug 2018
Posts: 305 Likes: 7
Sidelock
|
|
OP
Sidelock
Joined: Aug 2018
Posts: 305 Likes: 7 |
Ok freezing and heating and Kroil and painfull amounts of torque but nothing.
Ok maybe the 1st question I should have asked ... but do both bushings have RH threads?
Thanks
Travis
|
|
|
|
|
Joined: Feb 2006
Posts: 3,728 Likes: 50
Sidelock
|
|
Sidelock
Joined: Feb 2006
Posts: 3,728 Likes: 50 |
They both have the same threads. Most were 5/16-32 but I have heard of another. They are at a compound angle. If you have the bit or screwdriver that fits the slot perfect, I would try hitting it with a hammer while trying to turn it out.
A 4" adjustable works the best, even better than the tool they sell now.
David
|
|
|
|
|
Joined: Aug 2018
Posts: 305 Likes: 7
Sidelock
|
|
OP
Sidelock
Joined: Aug 2018
Posts: 305 Likes: 7 |
Thanks David
I have been giving it taps along the way but now that I am sure it is lefty loosey then I am going to try the drill press method. I will have to fab someway to chuck the receiver up in my table vice but once learned always applied.
Thanks again.
|
|
|
|
|
Joined: Feb 2002
Posts: 1,850 Likes: 150
Sidelock
|
|
Sidelock
Joined: Feb 2002
Posts: 1,850 Likes: 150 |
Using a drill press or mill w/a screw driver blade set in the slot and held securely down and then turn the quill by HAND as DerAmi suggests is the usual final way to success on the stubborn ones.
I've had the bit's break in attempts to remove some screws in this way but ultimately being successfull. At least there's no chance of slipping/skipping out of the screw slot with the bit or doing a wriggle pattern with the screw driver down the side of the frame.
The bushing may already be broken in 1/2, and with the torque applied by the blade inserted in the slot and pushed down, it is separating the halves and wedging them even tighter in the threaded hole.
The more pressure,,the tighter the grip the bushing has in the hole.
Take a moment and with a very small, thin narrow screwdriver blade, place it down onto and slightly into the slot on the one side of the bushing firing-pin hole so that a gentle tap w/a small hammer will show if it will rotate/unscrew at all.
A little oil in and around the bushing will help show if there's any movement of the part.
You don't want to damage the screw slot of course,,but you are just trying to see if the bushing unscrews or moves at all with the little help that this gives it.
This will not put any of the wedging action a full screw driver can produce to a cracked bushing, if in fact it is and we don't know that.
It is just to find out if the bushing is being locked in place by the common removal method.
If it moves at all with this, then a far move light handed approach to removing it is needed. Kind of kicking it around in rotation a part turn at a time with the same technique till it's out far enough to unscrew w/your fingers.
...and maybe it's just totally rusted into place and ain't gonna move w/o breaking.
Is there a real need to remove the bushing?.
Is it damaged or pitted, in need of replacement?
I know the feeling of 'it should come out,,it's made to be removed".
But in this case, removing may mean damaging. You'll win the war by removing it, but may wreak it in doing so and now you have to make and fit a replacement.
Hardly worth the exercise I'd think at this point.
|
|
|
|
|
Joined: Aug 2018
Posts: 305 Likes: 7
Sidelock
|
|
OP
Sidelock
Joined: Aug 2018
Posts: 305 Likes: 7 |
So far I have not messed anything up.
I agree part of it is the battle of wills and I hate losing or unloosing in this case. I am fine with winning slowly and deliberately though.
I was planning on re-CCH'ing this receiver and assumed the bushings would need to be out to do so. Otherwise I could leave them in place but also figured at some time in the future if a pin wore or broke (these are 121 years old by this time) I would have to remove anyway so seems like easier earlier than later.
Did I mention I hate losing.
Thanks for the input.
|
|
|
|
|
Joined: Feb 2008
Posts: 11,343 Likes: 389
Sidelock
|
|
Sidelock
Joined: Feb 2008
Posts: 11,343 Likes: 389 |
I don't think Kroil should even be classified as a penetrating oil because it has failed for me so many times. If Kroil loosens stuck threads, they probably weren't stuck all that bad in the first place. I have lots of it, and I use it as an assembly lube for rusty muffler clamps and things like that.
For really stuck threads, I agree with the repeated soldering iron heating and applications of a really GOOD penetrating oil as Mike suggested. Whenever I see electric soldering irons at automotive swap meets or flea markets for a buck or two, I buy them. I'm talking about the straight type with larger copper tips, usually 40 to 100 watts. I grind the tip to fit closely in the screw slot, and tie it in place vertically with wire so I can plug it in and let it heat for 10 or 15 minutes. Then unplug it, let it cool, and apply more penetrating oil. This alternating heating and cooling seems to help draw penetrating oil deep into the threads because of the repeated expansion and contraction. And it may be necessary to do it once or twice a day for several days or even weeks. Patience very important when removing stuck screws. The drill press method is excellent, but the ability to apply greater force at a strong downward angle also means that you may break a driver bit and do damage, or you may even strip or gall the threads if they have not had enough time for a penetrating lubricant to get way down deep to juice them up.
Remember that rust occupies much more volume than clean uncorroded steel, and it makes an abrasive thread-locker that can cause galling if you apply too much force too soon. This is why tapping helps. It compresses and breaks that bond, and also allows penetrant to get into the threads. I've had screws that I thought were hopelessly stuck and would need drilled out easily break free after several months of soaking. It also helps to cover the area with Saran Wrap to keep the penetrating oil from evaporating for these extended soaks. This is why it helps to have other projects to move on to while waiting.
A true sign of mental illness is any gun owner who would vote for an Anti-Gunner like Joe Biden.
|
|
|
|
|
Joined: Jul 2012
Posts: 4,463 Likes: 207
Sidelock
|
|
Sidelock
Joined: Jul 2012
Posts: 4,463 Likes: 207 |
Travis S
Kutter mentioned breaking a screwdriver bit. This is no problem compared to losing the bushing.
Mike
|
|
|
|
|
Joined: Aug 2018
Posts: 305 Likes: 7
Sidelock
|
|
OP
Sidelock
Joined: Aug 2018
Posts: 305 Likes: 7 |
Keith what are you good penetrating oil recommendations?
Thanks
Travis
|
|
|
|
|
Joined: Dec 2011
Posts: 908 Likes: 43
Sidelock
|
|
Sidelock
Joined: Dec 2011
Posts: 908 Likes: 43 |
If you have the wood off submerge it in a bucket of kerosene with some transmission fluid mixed in. Cheaper than Kroil and just as good. Just let it soak a week or 2.
|
|
|
|
|
Joined: Aug 2018
Posts: 305 Likes: 7
Sidelock
|
|
OP
Sidelock
Joined: Aug 2018
Posts: 305 Likes: 7 |
Yeah woods off so I will try that.
Thanks
|
|
|
|
|
Joined: Feb 2008
Posts: 11,343 Likes: 389
Sidelock
|
|
Sidelock
Joined: Feb 2008
Posts: 11,343 Likes: 389 |
Keith what are you good penetrating oil recommendations?
Thanks
Travis The very best I ever used was Cabot's Tasgon, but unfortunately, it was taken off the market in the early 1980's when creosote was banned by the EPA. I still have some that I use sparingly because it has to last the rest of my life. Watch for it at yard sales, flea markets, etc. I found a full quart a couple years ago at an automotive swap meet, and it made my whole day. I think Zep45 is pretty good, as is Zep45 Dual Force which contains PTFE (teflon). More recently I have tried Burlite and Mouse Milk, and they seem to do pretty good too. But I haven't used them enough to say for sure. I also like pure oil of wintergreen for small fasteners. The home brew of 50% actetone and 50% ATF works well too, but the acetone carrier evaporates quickly, and it needs to be covered with plastic or re-applied often. There have been numerous threads here over the years concerning penetrating oils, and techniques for removing stuck screws. Here's one of them: http://www.doublegunshop.com/forums/ubbthreads.php?ubb=showflat&Number=271977&page=1I'm kind of a junkie on this subject, and have been searching for years for something that works as well as the banned Tasgon. I would bet that there are at least 20 different brands in my shop, and most are no better than diesel fuel or straight kerosene. I would like to experiment with boiling an action with a frozen screw in a solution of Simple Green or some other detergent to remove all traces of oil, and then soaking in Evaporust or a molasses solution. I have been using molasses as a rust remover, and when it can get into threads, it turns the rust into black slime. It has worked well for me for freeing up frozen acme threads on rusty c-clamps and bar clamps after a few weeks of soaking. But they would definitely remove blueing since blueing is a form of rust. Both Evaporust and molasses work on the same principle of chelation to remove the oxygen atoms from rust molecules, and leave the iron behind. I can't tell you how many times I've read or been told that this or that is fantastic stuff, only to buy a can and be disappointed. To those who swear by Kroil, I say they really need to get out more. And it's tough to make comparisons sometimes, because there are different levels of corrosion, of different size screws, that are made of different alloys of steel. You just have to know when to back off on the force you are applying, before you break it or gall the threads, and try something different. And I can't over-emphasize the importance of being patient when you encounter a really tough one.
A true sign of mental illness is any gun owner who would vote for an Anti-Gunner like Joe Biden.
|
|
|
|
|
Joined: Aug 2018
Posts: 305 Likes: 7
Sidelock
|
|
OP
Sidelock
Joined: Aug 2018
Posts: 305 Likes: 7 |
Thanks Keith
I am and will continue to take it slow and not let it get me mad and distracted.
|
|
|
|
|
Joined: Jan 2002
Posts: 13,149 Likes: 1147
Sidelock
|
|
Sidelock
Joined: Jan 2002
Posts: 13,149 Likes: 1147 |
As a farmer who has dealt with rusted fasteners for all my life I can safely say I have never found anything any better than Zep45, in the mostly white can. I, personally, think it's better than acetone/ATF. Old exhaust manifold bolts can be tough, Zep is tougher. Repeated applications + patience, lots of patience = success.
SRH
May God bless America and those who defend her.
|
|
|
|
|
Joined: Feb 2002
Posts: 1,850 Likes: 150
Sidelock
|
|
Sidelock
Joined: Feb 2002
Posts: 1,850 Likes: 150 |
As long as you are doing this because you are going to re-case color the frame,,then don't be shy about using heat on the frame in that area to help unlock the bushing from it's seat.
The frame will go through an annealing process before polishing it up anyway before re-CCH. That'll be around 800/1000F.
Then it'll hit 1400F+ when re-CaseColored.
Some xciting heat now won't hurt it. It won't turn to a pile of goo.
Turn up the heat,, turn out the bushing and get it over with.
|
|
|
|
|
Joined: Aug 2018
Posts: 305 Likes: 7
Sidelock
|
|
OP
Sidelock
Joined: Aug 2018
Posts: 305 Likes: 7 |
Xciting heat. LOL
I will get after it this weekend and in the mean time get some ZEP.
|
|
|
|
|
Joined: Feb 2006
Posts: 3,728 Likes: 50
Sidelock
|
|
Sidelock
Joined: Feb 2006
Posts: 3,728 Likes: 50 |
I would almost guarantee that the busing is cracked and it filled in with what ever over the years. If you have an eye loop see if it is cracked, if so take a small cape chisel and remove the pieces.
There is usually a pair on eBay or they can be made using a 5/16-32" cap screw which is a Gr. 8.
David
|
|
|
|
|
Joined: Aug 2018
Posts: 305 Likes: 7
Sidelock
|
|
OP
Sidelock
Joined: Aug 2018
Posts: 305 Likes: 7 |
Any diffs between zep 45, zep 45 Sidewinder and zep 45 dual force?
I am still after this bushing, Use dheat, used freezing used crazy torque. If the zep 45 does not do it, then I am digging it out with a chisel.
Thanks
|
|
|
|
|
Joined: Feb 2008
Posts: 11,343 Likes: 389
Sidelock
|
|
Sidelock
Joined: Feb 2008
Posts: 11,343 Likes: 389 |
I believe Zep45 Dual Force is simply Zep45 with PTFE (Teflon) added. I haven't used it a great deal, but it seemed to work as good as regular Zep45. I have never used Zep45 Sidewinder, but doubt if it has any magical properties that would make it that much better.
You have been playing with this for less than two weeks. Some guys would have resorted to chisels, drills, and easy outs on day one. They might have also done permanent damage because of impatience too. This is a juncture where many old guns end up in the scrap box or get parted out. But I can recall some screws that resisted all efforts for weeks before finally moving. I had one of those notorious compensating screws on the action knuckle of a Lefever that wouldn't budge after using alternating heat, cold, vibration, tapping, etc. for a couple weeks. I finally doused it with several drops of that old Tasgon and wrapped the area in Saran Wrap to keep the penetrating oil from evaporating. I put it aside and moved on to other projects, and basically just forgot about it for about 6 months. When I finally got back to it, moderate torque on the screwdriver easily broke it free, and it took virtually no force to remove it. The threads were wet all the way down.
I'm saying that resorting to the chisel this soon may be rushing things if you don't need to use the gun for bird hunting next month. If you gall and tear the threads in the action, you may end up asking us how to make and install an oversize bushing. And as a last resort, before I used a chisel, I might think about the neat trick of welding a hex nut onto the bushing with a MIG welder. You use a nut with an I.D. somewhat smaller than the O.D. of the bushing, carefully center it, and weld the I.D. of the nut solid to the face of the bushing, or broken bolt, stud, etc. The intense welding heat breaks the bond of the rust, and after it cools, the hex flats allow you to turn it out with a wrench. More penetrating oil is advised because the welding will burn out any trace of lubrication. It is a last resort, and will require a new firing pin bushing if it works. the bushings are not perfectly perpendicular to the breech face, and the new one will need to be fitted and dressed.
A true sign of mental illness is any gun owner who would vote for an Anti-Gunner like Joe Biden.
|
|
|
|
|
Joined: Aug 2018
Posts: 305 Likes: 7
Sidelock
|
|
OP
Sidelock
Joined: Aug 2018
Posts: 305 Likes: 7 |
Thanks Keith
Yeah I have the time/patience give more soaking and zep a chance. In the end I have the skill to make/dress a new bushing but I do not want to go full ham handed and mess up the receiver.
Now onto the zep 45
Will check back in a few weeks.
|
|
|
|
|
Joined: Feb 2006
Posts: 3,728 Likes: 50
Sidelock
|
|
Sidelock
Joined: Feb 2006
Posts: 3,728 Likes: 50 |
Travis, if you do ruin the one, eBay has a pair for $22.00
https://www.ebay.com/itm/Lc-smith-63-FW-firing-pin-bushing/253874052014?hash=item3b1c129bae:g:QkwAAOSwOjpZcMcl
Don't pay attention to the FW part as the FW frame never had bushed firing pins.
They are in at a compound angle.
David
|
|
|
|
|
Joined: Aug 2018
Posts: 305 Likes: 7
Sidelock
|
|
OP
Sidelock
Joined: Aug 2018
Posts: 305 Likes: 7 |
Thanks David
I bought a set just in case.
|
|
|
|
|
Joined: Dec 2011
Posts: 908 Likes: 43
Sidelock
|
|
Sidelock
Joined: Dec 2011
Posts: 908 Likes: 43 |
I'll bet it's cracked and that is why it is jammed up.
|
|
|
|
|
Joined: Aug 2018
Posts: 305 Likes: 7
Sidelock
|
|
OP
Sidelock
Joined: Aug 2018
Posts: 305 Likes: 7 |
I am 99.99% sure as well it is broken. every time I torque lefty I torque it back righty and I get the slightest little pop every time. Some thing is moving jut not the whole bushing.
|
|
|
|
|
Joined: Dec 2011
Posts: 908 Likes: 43
Sidelock
|
|
Sidelock
Joined: Dec 2011
Posts: 908 Likes: 43 |
Have you tried a small punch, and lightly tapping the , as an example, the top left edge of the slot and then the bottom right. That will jam and unjam each half and allow it to wiggle around in the hole.
|
|
|
|
|
Joined: Aug 2018
Posts: 305 Likes: 7
Sidelock
|
|
OP
Sidelock
Joined: Aug 2018
Posts: 305 Likes: 7 |
I have not but that is a great suggestion. I will try that tonight. Many thanks.
|
|
|
|
|
Joined: Jan 2002
Posts: 13,149 Likes: 1147
Sidelock
|
|
Sidelock
Joined: Jan 2002
Posts: 13,149 Likes: 1147 |
You can work wonders with a small punch, a little hammer, and lots of patience. I've gotten wrung off screws out of blind holes with a tiny, sharp, prick punch by doing as Mark describes, and after liberal amounts of Zep45 have been administered.
SRH
May God bless America and those who defend her.
|
|
|
|
|
Joined: Aug 2018
Posts: 305 Likes: 7
Sidelock
|
|
OP
Sidelock
Joined: Aug 2018
Posts: 305 Likes: 7 |
The offending bushing died by blunt force trauma. First of all thanks to all the feedback. I am relatively new to double guns and I am even newer to LC Smiths. This gun is a 1987 field grade that I came by for 325 including a really nice leather mutton leg gun case. I happened to see it just as it was listed on GB and it had a buy in now of 325. I had been looking for a real nice and cheap learning project and there was just too much that looked like it was worth taking a chance on so I jumped on it. When I got it I was more than pleasantly surprised. The barrels look untouched, rang true and if it has a pit or two it is arguable. The stock was un-cracked and sound. The lock up is vault tight and smooth as silk. Not a spec of pitting on the other metal. Here is the receiver sans the son of a bushing. The left bushing came out easy enough. 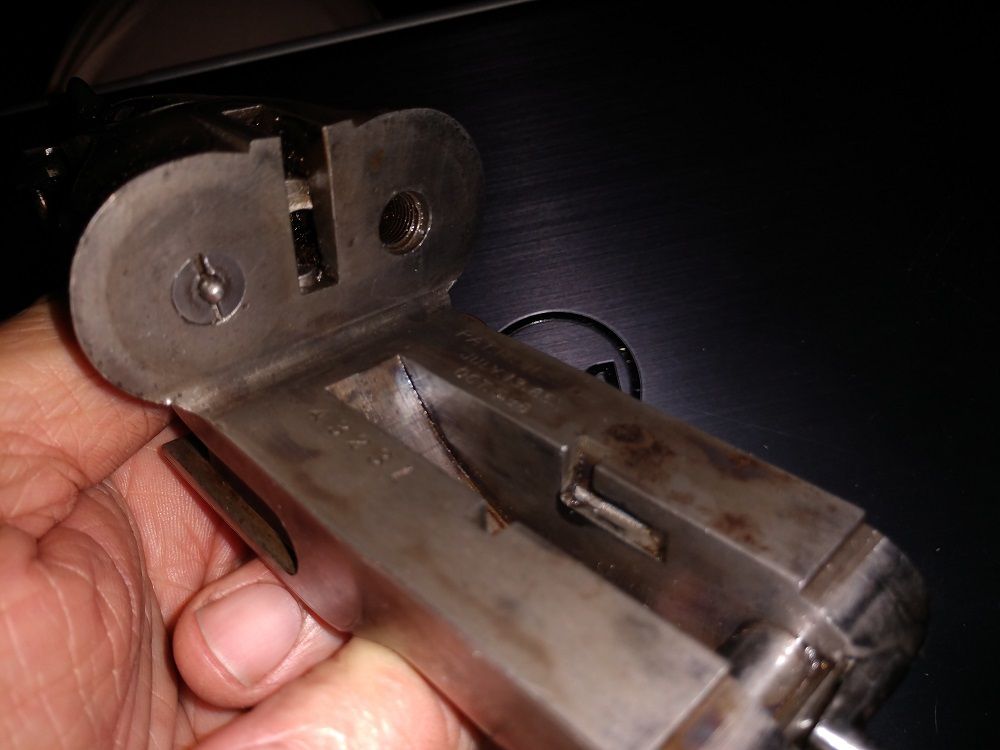 Couple other pics 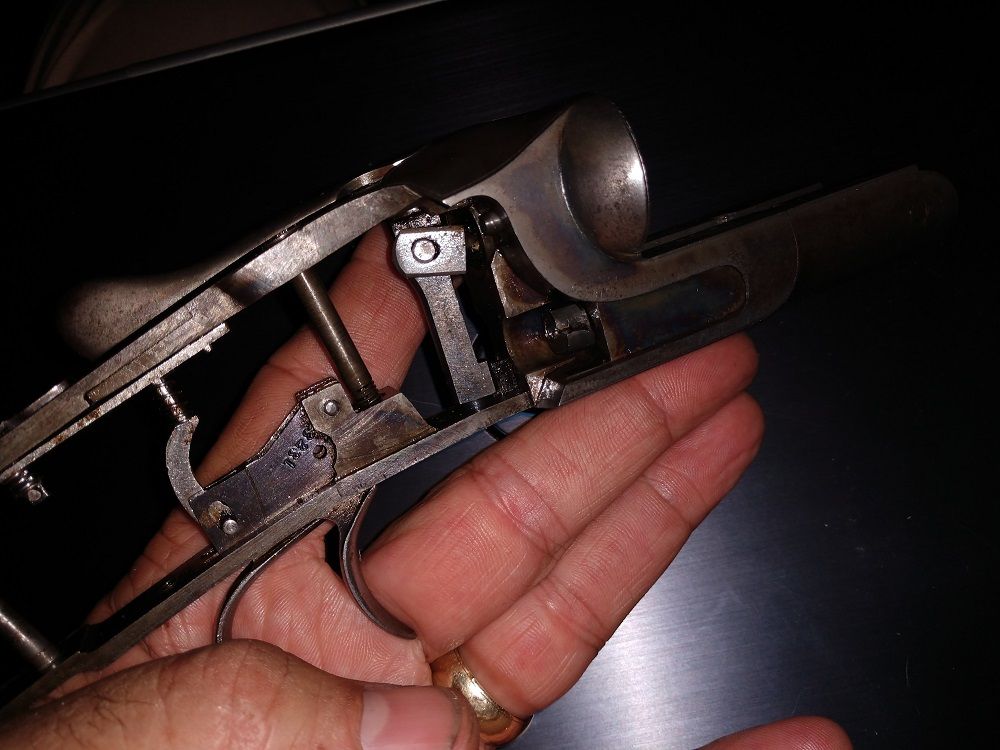 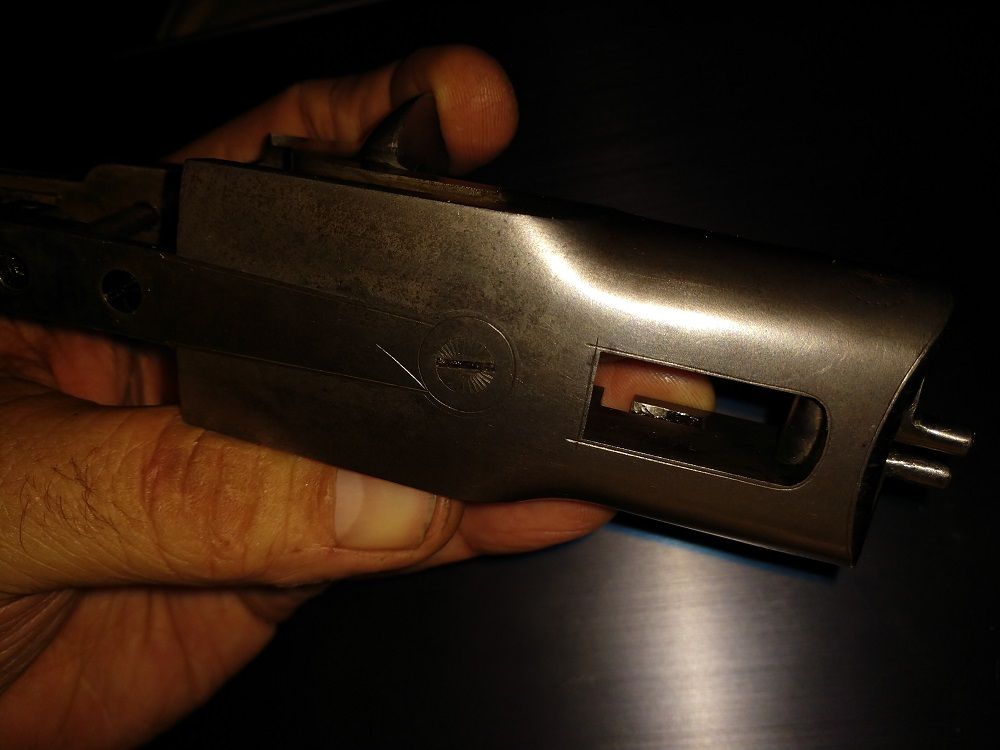 The deceased offender 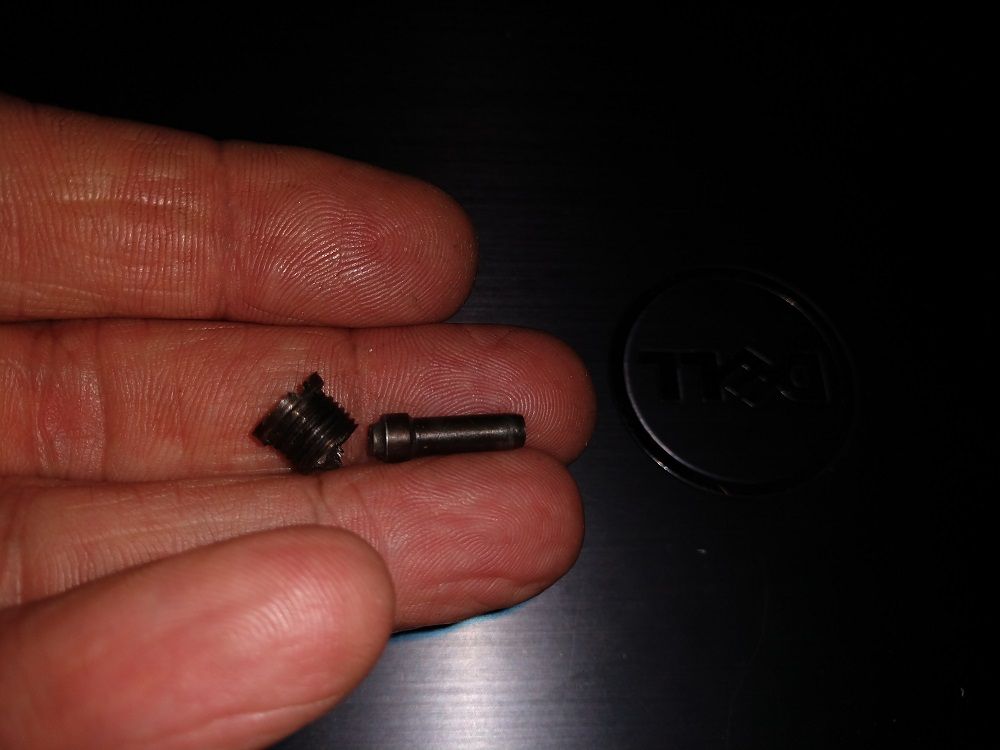 I took the advice of trying to rotate it with a punch. I had not taken the Zep to it though. The punch did nothing but mar the bushing. I feel pretty good about my self in that I gave it the requisite patience(this is against my nature but a moral victory all in of itself). At this Point I said damn it all and got back in touch with my cave man side and went in head long. I crafted a small chisel and started digging around the firing pin keeping a margin of metal surrounding the receiver threads. After I dug a little crater around the pin I pushed the pin toward the breach face and then took a chain saw sharpening stone and ground the FP protrusion flush down to the bottom of my crater. This allowed me to retract the pin recessing it about 3/32" into the bushing. I now had a section of bushing that did not have any pin in it and then using the this void section of bushing hole as a guide I drilled in the hole with 3 progressively larger bits still keep a margin of metal around the receiver threads. It took me 4 rounds to get through to the backside of the bushing which then allowed the pin to fall out. Back to the chisel and once I relieved a little metal at the top of the hole all the way back to the receiver I then used a punch to drive the busking out rotationally. Maybe luck but victory at last. No threads were harmed and I have a new set of bushings on the way. I am learning a lot and no high grade guns are being monkeyed with. Thanks for letting me share
Last edited by Travis S; 10/15/18 07:52 AM.
|
|
|
|
|
Joined: Feb 2006
Posts: 3,728 Likes: 50
Sidelock
|
|
Sidelock
Joined: Feb 2006
Posts: 3,728 Likes: 50 |
Travis, good job. Patience is a virtue. When you get the new bushings just put some masking tape over the face of the receiver and carefully file them. I doubt that you will get them in "time" like they came from the factory, but not a big deal. Did you find a spring for the safety arm? Maybe this picture will help. If you have a hardware store or Lowes or Home Depot you might be able to match up the turns to get the right tension, and cut to length. 
David
|
|
|
|
|
Joined: Dec 2011
Posts: 908 Likes: 43
Sidelock
|
|
Sidelock
Joined: Dec 2011
Posts: 908 Likes: 43 |
Good advice about the safety spring. Glad you were able to get the bushing out. If you do want to time the new bushings, use a small file with a safe edge to protest the threads and file material off the ledge on the back of the bushing.
|
|
|
|
|
Joined: Aug 2018
Posts: 305 Likes: 7
Sidelock
|
|
OP
Sidelock
Joined: Aug 2018
Posts: 305 Likes: 7 |
I actually have the spring. I just forgot to put it back on when I put the trigger plate back on.
I will try to adjust the timing for kicks and giggles.
Many thanks
|
|
|
|
|
Joined: Sep 2018
Posts: 11
Boxlock
|
|
Boxlock
Joined: Sep 2018
Posts: 11 |
I've used this technique successfully in cars that had oxidized aluminum to steel connections: heat with a small torch and melt beeswax into the heated joint. On cars the oxidized aluminum is like concrete and nothing separates it, but the beeswax trick!
|
|
|
|
|
Joined: May 2008
Posts: 8,158 Likes: 114
Sidelock
|
|
Sidelock
Joined: May 2008
Posts: 8,158 Likes: 114 |
Mark- I think maybe you mean: "To Protect the threads" not "Protest"-- When Hunter Arms dropped the bushed firing pin design about 1913-- what a great cost reduction that must have been- RWTF
"The field is the touchstone of the man"..
|
|
|
|
|


