April
S M T W T F S
1 2 3 4 5 6
7 8 9 10 11 12 13
14 15 16 17 18 19 20
21 22 23 24 25 26 27
28 29 30
Who's Online Now
3 members (Ted Schefelbein, NTaxiarchis, Jtplumb), 334 guests, and 2 robots.
Key: Admin, Global Mod, Mod
Forum Statistics
Forums10
Topics38,474
Posts545,167
Members14,409
Most Online1,335
Apr 27th, 2024
Previous Thread
Next Thread
Print Thread
Joined: Jan 2003
Posts: 1,227
Sidelock
**
OP Offline
Sidelock
**

Joined: Jan 2003
Posts: 1,227
This is my procedure for removing the stock from a Fox.

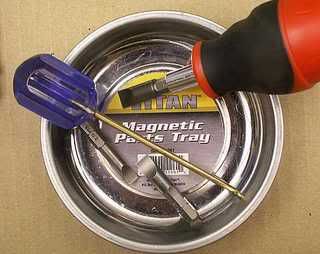
A magnetic parts tray is a convenient way to keep track of stuff. A screwdriver (I prefer a magnetic stubby for this work) with the proper size hollow gound bits is absolutely essential and Brownells is an excellent source. I use a 0.120” brass drift punch/alignment pin and mine came from Brownells.


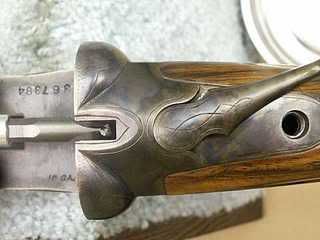
1) I remove the forend and barrels and push the lever to the right to expose the top tang screw and select the proper size bit….usually a 340-2 (.340” wide and .020” thick), sometimes a 340-3. It’s important that the bit fit deeply but snugly and fill the slot from side to side.


2) Applying pressure on the lever to the right and pushing down with a screwdriver on the trip pin in the rib extension recess allows me to ease the lever back to the center position. Note the trip pin has 2 flat sides at right angles...upon reassembly, one flat faces to the rear and the other towards the right barrel.


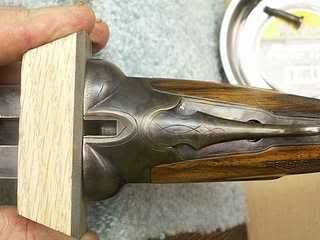
3) Assuming the hammers were cocked before the barrels were removed, I now press a wooden block against the breech face and pull the triggers to decock the action.


4) I next flip the gun over and, with the proper size bit, remove the wood screw securing the triggerguard. The guard unscrews with 4-5 turns, exposing the rear tang screw, but I don’t remove it yet..


5) I like to remove the forward floorplate screw first, again with a 340-3 on my SW’s, a 340-2 on my early A grade.


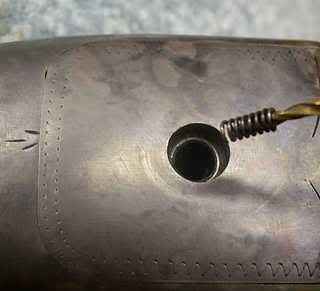
6) I like to use a 1/16” drill bit, screwed in by hand to capture the little trip spring in the bottom of the hole. I find this is safer than turning the action over and letting it fall out…..and roll under the workbench.


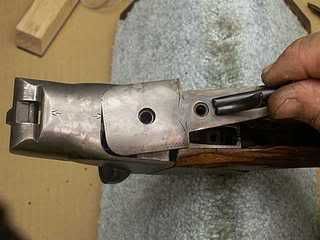
7) Now I turn the gun over, force the lever to the right to relieve pressure on the trip pin, and push it out the bottom with a small screwdriver (drift punch, etc). It could be left in, but that would mean the lever would have to stay to the right and there’s a risk of forgetting the pin and losing it accidentally. Best to have it safe and secure in the magnetic dish.


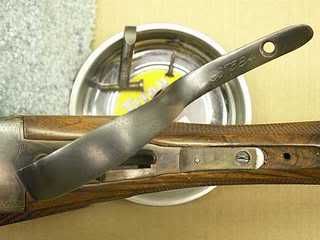
8) Now the rear tang screw can be removed and the floorplate lifted off, primary by wiggling and pulling up on the triggers. It may be necessary to tap around the action with a nylon or wooden mallet, but the stock will be loose at this time and great care must be taken not to chip the sharp edges of the inletting. From now until it’s off and clear of the action, the stock is very vulnerable to damage.


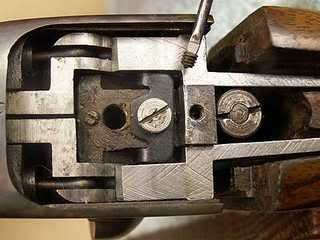
9) There are 2 tiny set screws locking the axles in place. We want to remove the rearmost, sear axle screw. It’s possible to just loosen it, but we’d only leave it engaged by a thread or two and there’s a risk of losing it…..best take it out and secure it. It’s very tiny and/or often buggered, so you may have to file a cheap jeweler’s driver to fit, as I did. For stock removal and action cleaning, only the rear sear axle needs to be removed. For a complete teardown, the forward screw and hammer axle would be removed later.


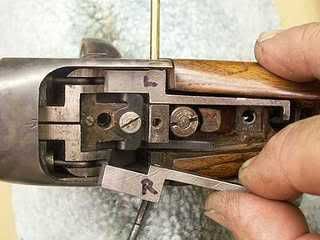
10) It’s not hard to figure out how to reinstall the sears, but for the first timer it’s helpful to letter them in their proper orientation. Here the .120” brass punch has drifted out the sear axle and been withdrawn halfway to release the right sear. It’s under very slight spring pressure…..nothing goes flying.


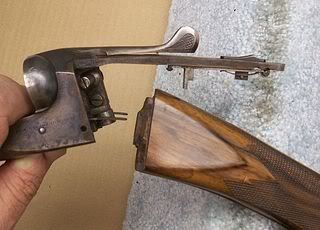
11) With both sears removed the stock can be tipped down and free. I find it a bit easier to go on and off if the safety is “ON” to the rear.


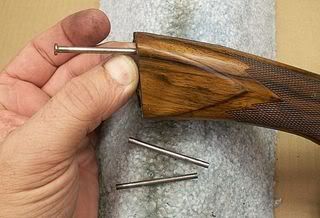
12) Lastly, the auto-safety rod, if present, is removed from it’s tunnel in the stock. I have a collection of them since I always remove them permanently, preferring a manual safety. One is headless, one has a very slight head and one has a head like a nail. They all measure 1.750 – 1.800” and I imagine that’s important, though I haven’t fiddled with them.


13) Assemble in reverse.


Joined: Jul 2002
Posts: 130
Sidelock
Offline
Sidelock

Joined: Jul 2002
Posts: 130
Thanks Mike:

I saw this on the Fox site and think this is just great. You need to do a complete manual for the Fox shotgun, what great pictures and steps to complete the task of taking off the stock. I think you would be able to sell a copy of your manual to every Fox owner--I would buy 3 copies, I have two Fox owning sons. Why don't you do the samething for the cleaning of a Fox. Thanks again, Ralph


Ralph
Joined: Feb 2006
Posts: 3,728
Likes: 50
Sidelock
**
Offline
Sidelock
**

Joined: Feb 2006
Posts: 3,728
Likes: 50
Mike, great pics and a great tutorial. I have a friends fox that was his grandfrathers and the stock is cracked through the wrist near the safety tang. I told him I would try and fix it, he will never shoot it but would like it fixed. I have never worked a a Fox before and this helps a lot.
Again thanks for the info.


David


Joined: Nov 2005
Posts: 4,598
Sidelock
***
Offline
Sidelock
***

Joined: Nov 2005
Posts: 4,598
Mike,

Thanks! This should be made into a FAQ.

Pete

Joined: Sep 2005
Posts: 6
Boxlock
Offline
Boxlock

Joined: Sep 2005
Posts: 6
I would love to see this stock removal procedure done on an L.C. Smith.

Joined: Jan 2003
Posts: 1,227
Sidelock
**
OP Offline
Sidelock
**

Joined: Jan 2003
Posts: 1,227
Thanks fellas! I'm glad it will be helpful to some.

WRDSMTH,

What we really need is an illustrated Elsie REASSEMBLY...complete with the factory method plus the couple of amateur alternatives for when someone butchers one following the factory procedure.


Joined: Feb 2005
Posts: 7,438
Sidelock
**
Offline
Sidelock
**

Joined: Feb 2005
Posts: 7,438
Mike:
Great instructions. I for one have struggled with Fox disassembly for years so I printed this for future reference.
Thanks
Jim

Last edited by italiansxs; 01/07/08 12:31 PM.

The 2nd Amendment IS an unalienable right.
Joined: Feb 2006
Posts: 3,728
Likes: 50
Sidelock
**
Offline
Sidelock
**

Joined: Feb 2006
Posts: 3,728
Likes: 50
WRDSMTH and Mike, what part of the Re-assembly would you like. I have done it the way the late Russ Ruppel explained it to me when I first started messing with them. The only difference in his re-assembly and the factory is that he used a 6" c-clamp with a 1 1/2" long by 3/32" dia. piece of drill rod fitted into the stationary part of the top jaw. This was to push against the top lever spring so that the top lever would go into the fit of the trigger plate for putting the 4-40 screw in. The factory used a nail set that went into the bottom of the trigger plate assembly to the top lever post and then used a screw driver with a v-shaped slot to push against the nail set to align the top lever into the fit of the trigger plate and then put the 4-40 screw in. I like Russ's way better. If you slip with the v-shaped screwdriver, you could ruin a few things.
Revdocdrew has posted some other ways also on the Picture Trail on the L.C. Smith site.
I don't have any apart right now, but if someone wants pictures of some of the tools, I can supply them.


David


Joined: Feb 2002
Posts: 1,850
Likes: 150
Sidelock
***
Offline
Sidelock
***

Joined: Feb 2002
Posts: 1,850
Likes: 150
Great pics and instructions. A couple things I can add. Re: pic#9...One thing I do after removing the set screw for the sear pin but before removing the pin itself, is to back out the sear spring screw a turn or two. That relieves the spring tension on the sears and the pin but the sear spring and screw remain in the gun. Makes removal and reassembly of sears and pin alot easier as you don't have to fight the spring pressure at all. After the sears are reinstalled, just retighten the sear spring screw and the spring pressure is reapplied them. If the gun were completely taken apart, the sear spring would be set into place and secured with it's screw but left a couple of turn loose for the same easy reassembly of the sears. Also, if the trigger plate is stubborn and doesn't want to come off the action, a punch placed down the top tang screw hole and carefully into the hole in the trigger plate boss gives you a spot to give it a couple of light taps to help it along. Cock the hammers from the front when fully assembled with a suitable implement


Link Copied to Clipboard

doublegunshop.com home | Welcome | Sponsors & Advertisers | DoubleGun Rack | Doublegun Book Rack

Order or request info | Other Useful Information

Updated every minute of everyday!


Copyright (c) 1993 - 2024 doublegunshop.com. All rights reserved. doublegunshop.com - Bloomfield, NY 14469. USA These materials are provided by doublegunshop.com as a service to its customers and may be used for informational purposes only. doublegunshop.com assumes no responsibility for errors or omissions in these materials. THESE MATERIALS ARE PROVIDED "AS IS" WITHOUT WARRANTY OF ANY KIND, EITHER EXPRESS OR IMPLIED, INCLUDING BUT NOT LIMITED TO, THE IMPLIED WARRANTIES OF MERCHANT-ABILITY, FITNESS FOR A PARTICULAR PURPOSE, OR NON-INFRINGEMENT. doublegunshop.com further does not warrant the accuracy or completeness of the information, text, graphics, links or other items contained within these materials. doublegunshop.com shall not be liable for any special, indirect, incidental, or consequential damages, including without limitation, lost revenues or lost profits, which may result from the use of these materials. doublegunshop.com may make changes to these materials, or to the products described therein, at any time without notice. doublegunshop.com makes no commitment to update the information contained herein. This is a public un-moderated forum participate at your own risk.

Note: The posting of Copyrighted material on this forum is prohibited without prior written consent of the Copyright holder. For specifics on Copyright Law and restrictions refer to: http://www.copyright.gov/laws/ - doublegunshop.com will not monitor nor will they be held liable for copyright violations presented on the BBS which is an open and un-moderated public forum.

Powered by UBB.threads™ PHP Forum Software 7.7.5
(Release build 20201027)
Responsive Width:

PHP: 7.0.33-0+deb9u11+hw1 Page Time: 0.086s Queries: 33 (0.053s) Memory: 0.8443 MB (Peak: 1.8989 MB) Data Comp: Off Server Time: 2024-04-28 05:11:27 UTC
Valid HTML 5 and Valid CSS