|
S |
M |
T |
W |
T |
F |
S |
|
|
1
|
2
|
3
|
4
|
5
|
6
|
|
7
|
8
|
9
|
10
|
11
|
12
|
13
|
|
14
|
15
|
16
|
17
|
18
|
19
|
20
|
|
21
|
22
|
23
|
24
|
25
|
26
|
27
|
|
28
|
29
|
30
|
|
|
|
|
|
|
8 members (SKB, Perry M. Kissam, KDGJ, Hoot4570, KY Jon, 1 invisible),
1,185
guests, and
6
robots. |
|
Key:
Admin,
Global Mod,
Mod
|
|
|
Forums10
Topics38,445
Posts544,844
Members14,406
| |
Most Online1,258
Mar 29th, 2024
|
|
|
|
Joined: Dec 2019
Posts: 271 Likes: 20
Sidelock
|
OP

Sidelock
Joined: Dec 2019
Posts: 271 Likes: 20 |
I will be working on recutting the checkering on my Parker GH fore end wood. Pattern still visible but worn smooth. Which checkering tools do I need? All advice welcome.
Last edited by LetFly; 11/24/20 01:18 PM.
|
|
|
|
|
Joined: Nov 2012
Posts: 122
Sidelock
|

Sidelock
Joined: Nov 2012
Posts: 122 |
If you have never done this before I would buy a basic checkering set from Brownells or Midway USA and practice cutting a straight line extensively then practice cutting straight parallel lines before even touching your Parker.
|
|
|
|
|
Joined: Dec 2019
Posts: 271 Likes: 20
Sidelock
|
OP

Sidelock
Joined: Dec 2019
Posts: 271 Likes: 20 |
Thanks. What do most folks use to hold the fore end in place and secure while working on the checkering? I have a stock checkering cradle but nothing to secure the fore end.
|
|
|
|
|
Joined: Sep 2016
Posts: 404 Likes: 29
Sidelock
|

Sidelock
Joined: Sep 2016
Posts: 404 Likes: 29 |
Jim
|
|
|
|
|
Joined: Nov 2005
Posts: 1,274 Likes: 1
Sidelock
|

Sidelock
Joined: Nov 2005
Posts: 1,274 Likes: 1 |
To hold fore end I've used a 3/4 dowel with a flat area to hold fore end, use machine screw to to secure fore end to dowel. Cut it to the correct length to fit in checkering cradle.
I learn something every day, and a lot of times it's that what I learned the day before was wrong
|
|
|
|
|
Joined: Aug 2003
Posts: 2,936 Likes: 16
Sidelock
|

Sidelock
Joined: Aug 2003
Posts: 2,936 Likes: 16 |
I use wooden broom handle. Bobby
|
|
|
|
|
Joined: Dec 2019
Posts: 271 Likes: 20
Sidelock
|
OP

Sidelock
Joined: Dec 2019
Posts: 271 Likes: 20 |
Any and all advice and insight on removing the stock from the frame on my Parker GH 1895 12g? This is a Parker with a #1 frame and barrels. 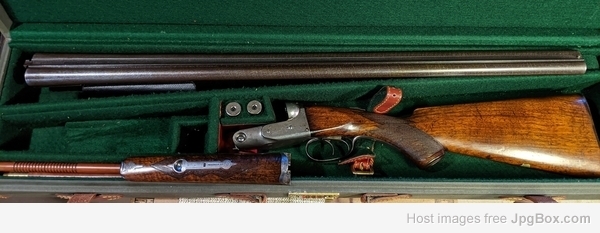 My winter project is to refurbish this fine old double just as I did with the Lefever G grade. The finish on this Parker is worn but in much better overall condition. I will be cleaning it up, removing or filling scratches and applying fresh finish. The wood is solid without any visible cracks or splits however I will check for any internal trouble when I get the metal separated from the wood. Barrels will be refinished. I have not done anything to this Parker except put woodcock in the bag over the past 25 years. As always all advice and insight is kindly welcomed.
Last edited by LetFly; 11/09/20 06:39 PM.
|
|
2 members like this:
HomelessjOe, Mills |
|
|
|
|
Joined: Dec 2001
Posts: 3,962 Likes: 89
Sidelock
|

Sidelock
Joined: Dec 2001
Posts: 3,962 Likes: 89 |
This link to the Parker Gun Collectors will take you step by step through removing the stock. Follow it exactly and you’ll be fine. For a lot more Parker information go to Parkerguns.org and click on their FAC section. Worlds of topics and “how to” stuff. http://www.parkerguns.org/pages/faq/StockRemoval.htmI will add that Parker checkering was flat topped and should be kept that way. Just don’t cut it too deep and you’ll be fine. Restoring the rounded mullered border is a bit more difficult. I used a very small rat tailed needle file to recut it on mine. And keep the two lines beside it very shallow with your single line cutter. You might find yourself using a small triangular needle file to work on these lines as they curve. I am pretty sure Parker cut the round portion of the border with a very small gouge.
When an old man dies a library burns to the ground. (Old African proverb)
|
|
|
|
|
Joined: Dec 2019
Posts: 271 Likes: 20
Sidelock
|
OP

Sidelock
Joined: Dec 2019
Posts: 271 Likes: 20 |
Thanks for the replies. I need advice on building a cradle to hold the forend while working on the checkering. If you have suggestions or a photo or two to share that would be helpful. I have a supply of wood and fasteners and plan to make my own. My plan is to convert/modify my gun cleaning vise as the base to hold the cradle. I do not require a full checkering cradle as I do not do full stocks. Here are a couple of photos of my Parker forend. 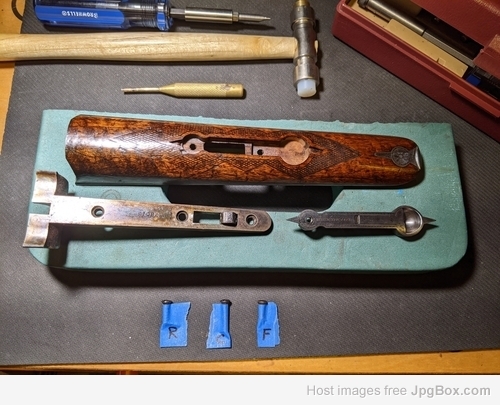 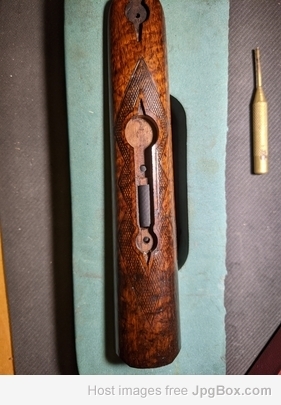
|
|
1 member likes this:
HomelessjOe |
|
|
|
|
Joined: Nov 2012
Posts: 122
Sidelock
|

Sidelock
Joined: Nov 2012
Posts: 122 |
Get some 1" or larger round stock. Flatten enough of one end to screw through the existing mounting holes. this will give you a firm connection and the round stock can be clamped in your vise jaws at any angle you want. Make sure you have good raking light to highlight the checkering as you progress
|
|
|
|
|
Joined: May 2004
Posts: 2,091 Likes: 13
Sidelock
|

Sidelock
Joined: May 2004
Posts: 2,091 Likes: 13 |
I made one from a broken wood broom handle. I use 2 screws to hold it in place careful not to screw it down too hard. Seems to work for me. Does not take much to hold a few ounces of wood.
So many guns, so little time!
|
|
|
|
|
Joined: Dec 2019
Posts: 271 Likes: 20
Sidelock
|
OP

Sidelock
Joined: Dec 2019
Posts: 271 Likes: 20 |
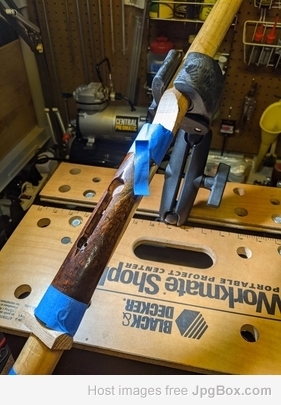 Thanks for the replies. This is my forend checkering cradle, thanks BD. Now I need tools. Amazingly difficult and expensive it is to acquire a tool or two. Many on eBay and evidently now considered collectables. One seller asking $240 for a Gunline starter set. I have a couple of Dem-Barts coming.
|
|
|
|
|
Joined: Dec 2011
Posts: 908 Likes: 43
Sidelock
|

Sidelock
Joined: Dec 2011
Posts: 908 Likes: 43 |
Just remember to rotate the fore end under your cutter. And position yourself so your arms can moved forward and back while looking straight down the line you are cutting.
|
|
|
|
|
Joined: Dec 2019
Posts: 271 Likes: 20
Sidelock
|
OP

Sidelock
Joined: Dec 2019
Posts: 271 Likes: 20 |
Thanks. I will put in some practice on an old piece before starting with the Parker.
|
|
|
|
|
Joined: Dec 2019
Posts: 271 Likes: 20
Sidelock
|
OP

Sidelock
Joined: Dec 2019
Posts: 271 Likes: 20 |
Cleaned up the finish on the Parker fore end and of course I discovered a split not evident with old finish in place. Always a good practice to look closely as I would have missed this without removing the fore end iron and the finish. How it appears that there is some oil in the wood given the dark coloration remaining. Before closing the split I would like to remove the oil as much as possible without discoloring the wood. Any and all advice welcome. Wood with old finish removed 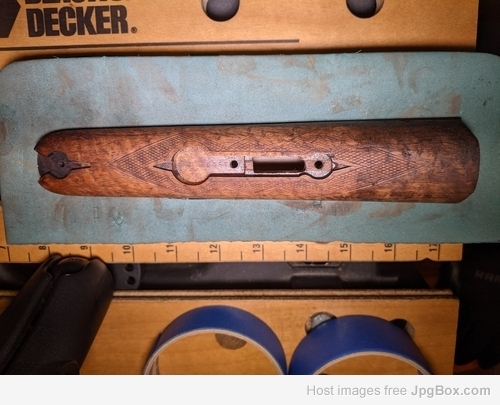 Split to be closed with some oil in wood 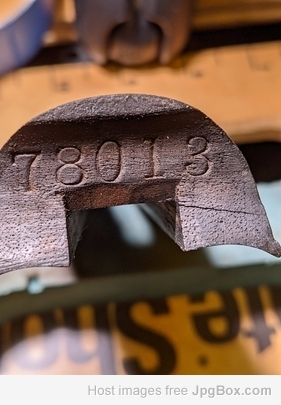
|
|
|
|
|
Joined: Jan 2002
Posts: 7,701 Likes: 99
Sidelock
|

Sidelock
Joined: Jan 2002
Posts: 7,701 Likes: 99 |
Doesn't look like enough oil to worry about, to me...Geo
|
|
|
|
|
Joined: Jan 2004
Posts: 6,703 Likes: 406
Sidelock
|

Sidelock
Joined: Jan 2004
Posts: 6,703 Likes: 406 |
I'm with Geo on this one. Will you epoxy bed the end grain? I probably would though I suspect most will not.
_________ BrentD, (Professor - just for Stan) ![[Linked Image from i.imgur.com]](https://i.imgur.com/qclHjMQ.jpg)
|
|
|
|
|
Joined: Dec 2019
Posts: 271 Likes: 20
Sidelock
|
OP

Sidelock
Joined: Dec 2019
Posts: 271 Likes: 20 |
Thanks. As for epoxy the end grain I always do so on the stock head mating surface but likely not here as I do not want to cover over the serial number. Would an application of CA help here?
|
|
|
|
|
Joined: Jan 2004
Posts: 6,703 Likes: 406
Sidelock
|

Sidelock
Joined: Jan 2004
Posts: 6,703 Likes: 406 |
Thanks. As for epoxy the end grain I always do so on the stock head mating surface but likely not here as I do not want to cover over the serial number. Would an application of CA help here? Yes, it will prevent wood degradation and oil damage. It isn't good for bedding of course and I understand why you would want to keep the serial.
_________ BrentD, (Professor - just for Stan) ![[Linked Image from i.imgur.com]](https://i.imgur.com/qclHjMQ.jpg)
|
|
|
|
|
Joined: Feb 2002
Posts: 1,850 Likes: 150
Sidelock
|

Sidelock
Joined: Feb 2002
Posts: 1,850 Likes: 150 |
I still pull oil out of the wood using Whiting Powder.
Very slow but very effective.
The very slow part makes it not very popular for use anymore. Things have to happen quickly or at most over night it seems.
They won't with Whiting, but you can draw all of the excess oil out with patience.
..Just have other things to keep you busy in the mean time...
For that crack..
If you can carefully lift the piece enough to get glue into the crack the full lenght of the split, I'd go with that.
If not wanting to risk cracking further, I'd grind the crack open a bit further along it's interior length.
Dental burrs are great for this. Tiny m/m dia ball and cylinder shaped cutters do quick clean work and are easy to control.
Yes a Dremel is used or if you are so lucky to have a special attachment for a Foredom handpiece or such equipment to use.
Then use epoxy to repair the crack in this instance.
In the orig fix you could actually just use a WoodWorkers glue and it'd work just as well in adry, oil clean environment.
In either case I'd top off the repair with a metal 'staple' across the split in the end grain. It doesn't need to be overly large or the legs tremendously deep.
Make one from a small finishing nail bent to shape and legs clipped to length with pliers and wire cutter.
Use the Dental Burrs once again to dig out the cavity needed to seat the staple down into the wood on both sides of the repair plus bury the head below the surface slightly.
The head of the staple gets hidden just below the surface cleanly during an epoxy repair.
The forend iron will take care of the fit as well as push the repaired piece into perfect allaignment along the side of the forend metal tang.
Ser# in the wood will be untouched.
Don't forget release agent on the forend iron.
|
|
|
|
|
Joined: Feb 2002
Posts: 1,850 Likes: 150
Sidelock
|

Sidelock
Joined: Feb 2002
Posts: 1,850 Likes: 150 |
A simple way to see if there is oil in the wood,
Take a flat screw driver blade and press it (the tip & flat) down onto the wood and draw it backwards a small amt,,maybe 1/8" or so.
If there is oil in the wood, it's just under the surface and doing this little technique will squeeze the oil out.
The surface that the blade compresses will become 'wet', that's the oil. Sometimes a small puddle even forms in the tiny depression and the tip of the screwdriver is also wet with oil.
Do this in the inside of the stock of course,,in the inletting, under a grip cap or butt plate.
You can also use a knife blade held almost flat to the surface. Raise the back edge just a bit an pull it back. The edge does the same thing as above and compresses the wood slightly and squeezes out any oil if it's there.
The wider knife blade can be used on the outside areas of the wood if you don't get carried away.
But compressing small areas of the wood is doing just that. So when it comes to (re)finishing time they can show unless you are going to do some wood removal or dent raising.
Stick to the internal surfaces when testing.
Most often it's in the inletting anyway. If it's there you can figure it's also soaked in further back into the grip area as well.
|
|
|
|
|
Joined: Feb 2008
Posts: 11,336 Likes: 388
Sidelock
|

Sidelock
Joined: Feb 2008
Posts: 11,336 Likes: 388 |
I like to start cleaning gun stock wood with something mild like Murphy's Oil Soap or dishwashing detergent. For wood that is oil soaked, I like to start with absorbents such as whiting or kitty litter, with gentle heat to help bring the oil to the surface. I have also found that a solution of household ammonia does a great job of removing old grunge and skin or gun oils that are on the surface. Ammonia turns oils into a soap, which then can be rinsed away with warm water. But remember to rinse off all ammonia residue completely because it can damage wood. I only resort to soaks in organic solvents such as acetone, lacquer thinner, etc. as a last resort. These harsh organic solvents will absolutely damage the cellulose and lignin structure of the wood, so soak times should be kept to an absolute minimum. Kutter's advice to go slow and easy, and to be very patient is priceless. The oil did not soak deep into the wood in a short time, and it will not come back to the surface in a short time either.
Oil removal will always be a compromise, and I do not believe that it is possible to remove all traces of oil that has soaked deep into the wood without causing even more damage to the wood. I learned this the first time I set a stock aside for a month or so after I de-oiled it. When I finally got ready to apply finish, I noticed that my nice clean wood had dark oily areas again, because the oil deep in the wood migrated back to the surface. The best we can hope for with deeply oiled wood is to arrest the damage and stabilize things before the wood becomes punky or rotted. I do agree with Geo that your forend wood does not look deeply oil soaked. But pictures can be deceiving. I'd be very cautious about sealing the end grain with CA or epoxy because any that gets on the exposed surfaces is going to affect the even penetration of any stains or stock finish you use. I won't repeat all of the reasons I prefer to use Titebond II wood glue versus epoxy when you are able to get most oil out of the wood, except to say that properly prepared joints are stronger than the wood, and it gives me a more invisible repair than anything else I have used. Of course, the crack shown at the butt end of your forend may not appear on the exposed surface.
A true sign of mental illness is any gun owner who would vote for an Anti-Gunner like Joe Biden.
|
|
|
|
|
Joined: Mar 2019
Posts: 109
Sidelock
|

Sidelock
Joined: Mar 2019
Posts: 109 |
Keith-what would be a method of general heat?
|
|
|
|
|
Joined: Jan 2002
Posts: 13,146 Likes: 1146
Sidelock
|

Sidelock
Joined: Jan 2002
Posts: 13,146 Likes: 1146 |
Trooper, Keith said gentle heat, not general.
Gentle heat : suspend over a radiator - use a hair dryer on a lower setting - let it in the sun on your truck dashboard on warm, clear afternoons - leave in your oven on the lowest setting overnight, etc.
SRH
May God bless America and those who defend her.
|
|
|
|
|
Joined: Mar 2019
Posts: 109
Sidelock
|

Sidelock
Joined: Mar 2019
Posts: 109 |
Thanks Stan I think auto-correct got me.
|
|
|
|
|
Joined: Dec 2019
Posts: 271 Likes: 20
Sidelock
|
OP

Sidelock
Joined: Dec 2019
Posts: 271 Likes: 20 |
Thanks, all. I am contemplating my next action to close the split. Close examination shows it to be very shallow and tight. I am thinking of two steps. First wicking some CA into it and second filling it with epoxy applied to warmed wood to close it up. I followed great advice given here and used Titebond II on my Lefever G to very good results however the split is so tight that I do not think it will work in this case.
Last edited by LetFly; 11/27/20 10:36 AM.
|
|
|
|
|
Joined: Dec 2019
Posts: 271 Likes: 20
Sidelock
|
OP

Sidelock
Joined: Dec 2019
Posts: 271 Likes: 20 |
Split cleaned, sealed and filled. 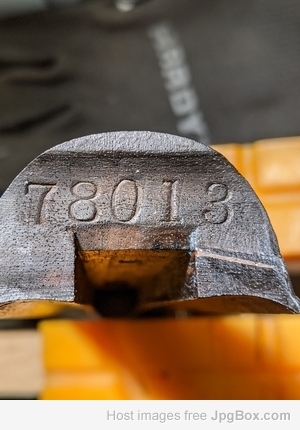
|
|
|
|
|
Joined: Dec 2019
Posts: 271 Likes: 20
Sidelock
|
OP

Sidelock
Joined: Dec 2019
Posts: 271 Likes: 20 |
As with each project I start out thinking I will do a little light clean up but then... Here is the next item to repair on the forend. A small divot along the left barrel border. The divot is 20mm in length. Piece gone a long time and wood is worn smooth. I have repaired these in the past with AcraGlas. On this Parker I am open to other suggestions and advice. I would like to repair with laid in wood sliver matching grain but I have not done this so help welcome. 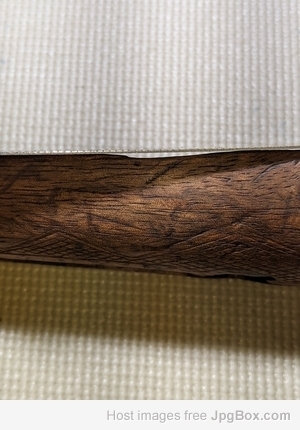
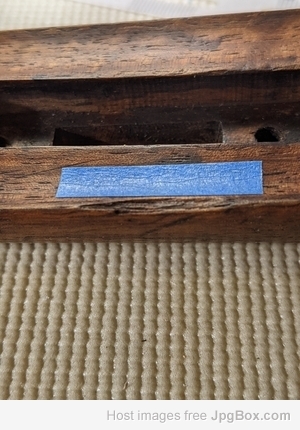
Last edited by LetFly; 11/28/20 02:56 PM.
|
|
|
|
|
Joined: Dec 2019
Posts: 271 Likes: 20
Sidelock
|
OP

Sidelock
Joined: Dec 2019
Posts: 271 Likes: 20 |
Practice,and practice some more. Clearly not the Parker forend. 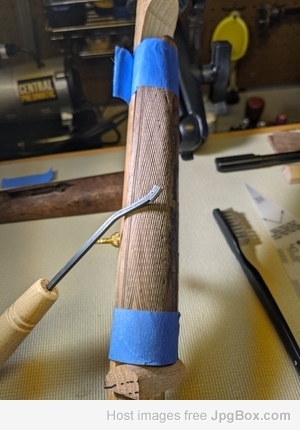
|
|
|
|
|
Joined: Dec 2019
Posts: 271 Likes: 20
Sidelock
|
OP

Sidelock
Joined: Dec 2019
Posts: 271 Likes: 20 |
Note: spacing on the checkering on this 1893 Parker GH appears to be 22 lpi using a Dem-Bart lpi template.
|
|
|
|
|
Joined: Dec 2019
Posts: 271 Likes: 20
Sidelock
|
OP

Sidelock
Joined: Dec 2019
Posts: 271 Likes: 20 |
A few more photos on the forend. Wood cleaned and now ready for grain filling, nick repair, finish. 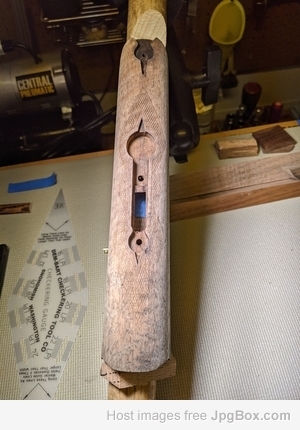 Checkering to be recut after finish 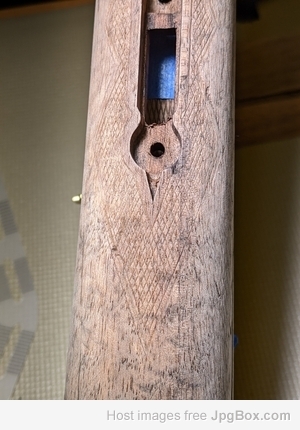 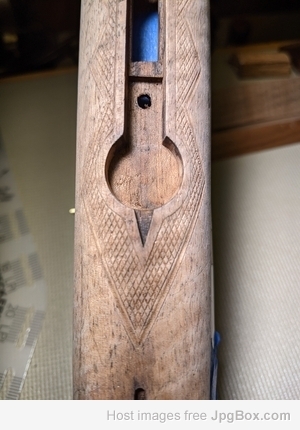 Nothing like a good project.
|
|
|
|
|
Joined: May 2004
Posts: 2,091 Likes: 13
Sidelock
|

Sidelock
Joined: May 2004
Posts: 2,091 Likes: 13 |
Nor really sure from the pictures but those black spots should come out with a dilute mixture of Oxalic acid and then rinsed.
So many guns, so little time!
|
|
|
|
|
Joined: Dec 2019
Posts: 271 Likes: 20
Sidelock
|
OP

Sidelock
Joined: Dec 2019
Posts: 271 Likes: 20 |
Thanks. I have not used Oxalic acid before. I will check it out. Any advice on use?
|
|
|
|
|
Joined: May 2004
Posts: 2,091 Likes: 13
Sidelock
|

Sidelock
Joined: May 2004
Posts: 2,091 Likes: 13 |
It should be available in any hardware store and is fairly inexpensive (or it was). You put a few white crystals in an ounce of water and mix it up. Mine looks like salt so a pinch of salt is what I use. I use a small stiff brush and dab it on. It will work in less than a minute in my experience. It will bleach stains especially the black ones where metal meets wood. It does not leave a stain. I rinse the wood off in cool water since it is an acid and you probably don't want to leave it on for long.
So many guns, so little time!
|
|
|
|
|
Joined: Feb 2002
Posts: 1,850 Likes: 150
Sidelock
|

Sidelock
Joined: Feb 2002
Posts: 1,850 Likes: 150 |
I'll second the use of Wood Bleach (Oxalic Acid) I put about a 1/2 teaspoon of the crystals in a quart jar of plain water. Then heat the stirred mixture in the microwave for 30 to 40 seconds. That warms it up just nice and it seems to work really well. The directions on the mfg'rs packaging are to mix in hot water. But just warmed up seems to be fine. I slosh it on with a piant brush,,even dunk pieces like the forend right into the jar if they'll fit. One end then the other. You'll see the black marks and other discolorations go away right while your are doing this as well as the wood lighten up in color. It won't bleach it to 'white'. Just lighten the orig color and overall even the color of the piece. Flush with cool water and again use the brush gently. The wet, warm stock wood can be easily bruised in this condition so be careful with it. Shake it dry and then let it dry naturally. It won't take very long to appear dry,,30 minutes or so. But let it dry over nite at least before doing anything to it further. Resist the temptation to speed dry with a torch flame , stove burner or even leaving it in direct sunlight. You don't want to chance burning edges of the inletting nor warping anything. Here's the stuff I've been using since forever. I bought it at HomeDepot and other like stores.. https://savogran.com/pdfs/Wood_Bleach_PD.pdfIn the last year for some reason, I get strange looks when I asked for the stuff as it wasn't on the shelf in the normal spot in the Paint Dept. They didn't know what I was even talking about. So I did find a Deck cleaner that is Oxalic Acid. ,,and bought that instead. I think it's Thompson's brand. It works just as well but is a liquid mix. I used it 1:1 w/water and it seemed OK. There were 2 Deck Cleaners...The above and another that was for use in a power washer. This one contained detergent and a 'grit' to clean off the old finish....Not the one you want. The first one clearly states..Active ingredient Oxalic Acid
|
|
|
|
|
Joined: Jan 2002
Posts: 13,146 Likes: 1146
Sidelock
|

Sidelock
Joined: Jan 2002
Posts: 13,146 Likes: 1146 |
Kutter, thanks yet again for an excellent tutorial. I was considering posting a question here about how to use Oxalic acid. Now, there's no need.
Bravo!
SRH
May God bless America and those who defend her.
|
|
|
|
|
Joined: Jan 2004
Posts: 6,703 Likes: 406
Sidelock
|

Sidelock
Joined: Jan 2004
Posts: 6,703 Likes: 406 |
Oxalic acid (aka wood bleach) is also available in the paint section at my local True Value hardware store - I would imagine it is available in all True Value stores. I bought it for treating my honeybees for mites just last weekend.
_________ BrentD, (Professor - just for Stan) ![[Linked Image from i.imgur.com]](https://i.imgur.com/qclHjMQ.jpg)
|
|
|
|
|
Joined: Feb 2008
Posts: 11,336 Likes: 388
Sidelock
|

Sidelock
Joined: Feb 2008
Posts: 11,336 Likes: 388 |
In the last year for some reason, I get strange looks when I asked for the stuff as it wasn't on the shelf in the normal spot in the Paint Dept.
They didn't know what I was even talking about.
Over the last month, I have been doing some work on a house that my daughter bought. In several recent trips and phone calls to Lowes and Home Depot, I have encountered an alarming number of their employees who don't even know what drywall or plywood is. No exaggeration, they actually have no idea what department those items are in, to direct inquiries for pricing, etc. Based upon my recent experience when I asked in what aisle I would find spackling compound, I'd imagine that a similar query about oxalic acid would result in wasting about 30 minutes of your life. I'm sorry, but when you hire someone to work in a home improvement and building supply warehouse, they should not be ignorant about even basic things. On my last trip to Home Depot, the cashier had no clue how to run her cash register.
A true sign of mental illness is any gun owner who would vote for an Anti-Gunner like Joe Biden.
|
|
|
|
|
Joined: Dec 2019
Posts: 271 Likes: 20
Sidelock
|
OP

Sidelock
Joined: Dec 2019
Posts: 271 Likes: 20 |
Thanks all. As this is an acid do you neutralize with soda as they recommend in the furniture restoration trade? Do you worry about corrosion where wood and metal contact?
Last edited by LetFly; 12/02/20 01:58 PM. Reason: removed reference to vinegar
|
|
|
|
|
Joined: Dec 2001
Posts: 6,991 Likes: 402
Sidelock
|

Sidelock
Joined: Dec 2001
Posts: 6,991 Likes: 402 |
I always rinses well then neutralize with baking soda.
|
|
|
|
|
Joined: Jan 2004
Posts: 6,703 Likes: 406
Sidelock
|

Sidelock
Joined: Jan 2004
Posts: 6,703 Likes: 406 |
Letfly, you would not neutralize an acid with vinegar - which is also acidic.
_________ BrentD, (Professor - just for Stan) ![[Linked Image from i.imgur.com]](https://i.imgur.com/qclHjMQ.jpg)
|
|
|
|
|
Joined: Dec 2019
Posts: 271 Likes: 20
Sidelock
|
OP

Sidelock
Joined: Dec 2019
Posts: 271 Likes: 20 |
BrentD, good point. Some do this on furniture, but perhaps for another reason. I will use a soda wash as I do when cleaning metal with peracetic acid.
|
|
|
|
|
Joined: Jan 2002
Posts: 13,146 Likes: 1146
Sidelock
|

Sidelock
Joined: Jan 2002
Posts: 13,146 Likes: 1146 |
Closest Lowe's and Home Depot is nearly an hour's drive from me. I ordered a tub of Savogran Oxalic Acid from eBay for $12 and some change, free shipping. It'll be here before I would have a chance to drive there.
I had an almost unbelievable experience at the Home Depot there years ago. I was looking for metal studs, AIR. I found them but they were on the top shelf of those high multi-shelf racks on either side of the aisles. I got an employee to come. I said I want those, and pointed up high at them. He stammered, looked at them, then said "You'd be better off to go across the street and get them at Lowe's". I stared at him in disbelief, and said okay. I went straight and found the manager, told him what the employee had said, and pointed him out to him. Last thing I saw was the manager headed his way.
Loves me some ebay. If those places won't hire better help than that I don't owe them any loyalty.
May God bless America and those who defend her.
|
|
|
|
|
Joined: Jan 2002
Posts: 13,146 Likes: 1146
Sidelock
|

Sidelock
Joined: Jan 2002
Posts: 13,146 Likes: 1146 |
The wet, warm stock wood can be easily bruised in this condition so be careful with it. Reading back over your directions for the use of the wood bleach I noticed the above. Nowhere prior did you mention warming the stock wood prior to the use of the bleach, only the water. Did you omit that, or is warming the wood not necessary? Thanks again for the excellent instructions. I have a perfect "patient" waiting for the "medicine" order to arrive. I have used whiting on it for over a year and no more oil is coming to the surface. It wasn't really that bad to begin with. But ........ there are black stains in several places that need removing before staining and finishing. Thanks, SRH
May God bless America and those who defend her.
|
|
|
|
|
Joined: Feb 2002
Posts: 1,850 Likes: 150
Sidelock
|

Sidelock
Joined: Feb 2002
Posts: 1,850 Likes: 150 |
The wood will be warm from the warmed soln application of the oxalic acid while you are brushing it on or dunking the wood into it.
No need to warm up the wood itself in any way like under a light bulb or with a heat gun, ect. At least I've never done that or seen the need to.
The stock will cool off of course when you flush the stuff off.
The main thing is to just be extra careful with the wet wood. It dents and bruises very easily.
|
|
|
|
|
Joined: Jan 2002
Posts: 13,146 Likes: 1146
Sidelock
|

Sidelock
Joined: Jan 2002
Posts: 13,146 Likes: 1146 |
May God bless America and those who defend her.
|
|
|
|
|
Joined: Dec 2019
Posts: 271 Likes: 20
Sidelock
|
OP

Sidelock
Joined: Dec 2019
Posts: 271 Likes: 20 |
Back to forend repair prior to finish and recut checkering Divot to be repaired  Divot repair in progress 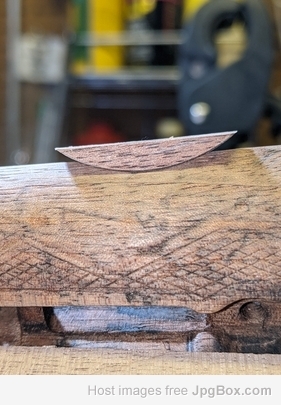 Practice piece first 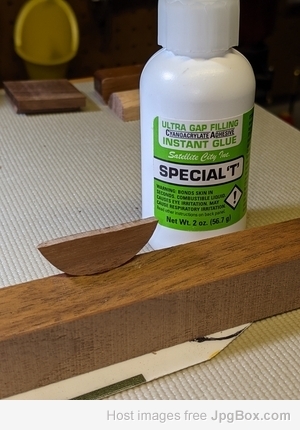
Last edited by LetFly; 12/04/20 12:53 PM.
|
|
|
|
|
Joined: Dec 2019
Posts: 271 Likes: 20
Sidelock
|
OP

Sidelock
Joined: Dec 2019
Posts: 271 Likes: 20 |
Stains removed with oxalic acid solution - 2 tsp in 8oz hot water. Soda water and clear water rinse. Air dry.    My thanks to all on this thread.
|
|
|
|
|
Joined: Dec 2019
Posts: 271 Likes: 20
Sidelock
|
OP

Sidelock
Joined: Dec 2019
Posts: 271 Likes: 20 |
I decided to give the wood one more treatment with the oxalic acid. After reviewing my go to reference on wood finishing by Flexner I decided to follow his advice and leave the solution on until it dried, then rinse off with clean water and neutralize with soda water or ammonia bath. I used soda. Results are excellent. Now I have the walnut piece from 1893. Oxalic solution dried on wood:  Cleaned forend: Wiped with mineral spirits 
|
|
|
|
|
Joined: Dec 2019
Posts: 271 Likes: 20
Sidelock
|
OP

Sidelock
Joined: Dec 2019
Posts: 271 Likes: 20 |
Divot repair results 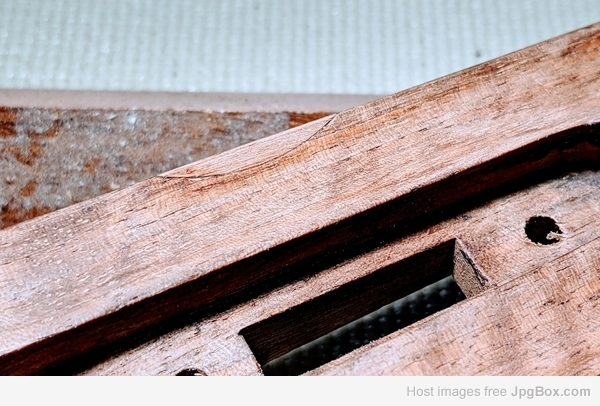 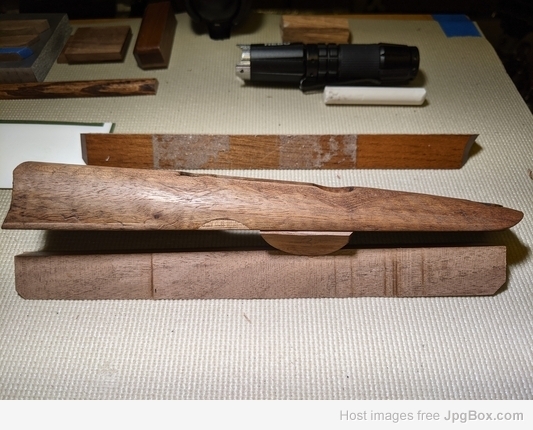 (thanks to Craig Budgeon over on the Parker forum for guiding me through this repair)
|
|
|
|
|
Joined: Jan 2002
Posts: 13,146 Likes: 1146
Sidelock
|

Sidelock
Joined: Jan 2002
Posts: 13,146 Likes: 1146 |
I'm anxious to see the final results after staining (?) and applying finish. I have done several glued repairs and have had mixed results as far as hiding the glue line and getting it all to match up. On one, which was a crack behind the lock plate, it absolutely "went away". I can't even find where it was. But, on others it's still visible after finishing, and I am at a loss to determine why this happens.
I hope yours blends in so perfectly that you can't find it. Then, you can relate the procedure to us. I am just in awe of some of the work the pros do with hiding repairs in gunstocks.
Best, SRH
May God bless America and those who defend her.
|
|
|
|
|
Joined: Feb 2008
Posts: 11,336 Likes: 388
Sidelock
|

Sidelock
Joined: Feb 2008
Posts: 11,336 Likes: 388 |
Like Stan, I was also in awe of some of the virtually invisible repairs done by some stock repair specialists. That was what prompted me several years ago to do some tests of various adhesives. I planed some walnut and glued pieces together using a couple of PVA wood glues, cyanoacrylate, polyurethane glue, and several different epoxies. Then I sanded and finished the glue joints with various finishes. Titebond II wood glue gave me the best results with a well fitted joint.
Fitting and correct clamping is extremely important. If you count on any glue or epoxy to fill a slight gap, that glue line will be very visible when the finish is applied. No dye or color is going to help much. But even a perfectly fitted patch may stick out like a sore thumb if the patch does not match the parent wood. So I also keep a large box of different walnut scraps from various species of walnut. When doing a repair, it pays to spend some time to find a piece that has the same color, grain, figure, and pores as the stock I am repairing. Another trick is to use the point of an X-acto knife to artificially extend pores across the repair joint.
A true sign of mental illness is any gun owner who would vote for an Anti-Gunner like Joe Biden.
|
|
|
|
|
Joined: Feb 2008
Posts: 11,336 Likes: 388
Sidelock
|

Sidelock
Joined: Feb 2008
Posts: 11,336 Likes: 388 |
BrentD, why are you reading my post, when you repeatedly claim that you use the IGNORE function to IGNORE my posts???
Must be a disingenuous Libtard thang.
A true sign of mental illness is any gun owner who would vote for an Anti-Gunner like Joe Biden.
|
|
|
|
|
Joined: Dec 2019
Posts: 271 Likes: 20
Sidelock
|
OP

Sidelock
Joined: Dec 2019
Posts: 271 Likes: 20 |
Keith, I used Titebond on your recommendation on my Lefever to very good results (Titebond III). These splits were in the forend and stock head. The final finish was on the dark side and the glue lines are quite well hidden.
|
|
|
|
|
Joined: Jan 2004
Posts: 6,703 Likes: 406
Sidelock
|

Sidelock
Joined: Jan 2004
Posts: 6,703 Likes: 406 |
Keith, I used Titebond on your recommendation on my Lefever to very good results (Titebond III). These splits were in the forend and stock head. The final finish was on the dark side and the glue lines are quite well hidden. It is interesting that Steven Dodd Hughes also recommends wood glues for gun repair. I've not used it myself since most of the cracks have been more easily dealt with using other adhesives that are a bit more weather resistant, though T3 is reasonably water resistant.
_________ BrentD, (Professor - just for Stan) ![[Linked Image from i.imgur.com]](https://i.imgur.com/qclHjMQ.jpg)
|
|
|
|
|
Joined: Dec 2019
Posts: 271 Likes: 20
Sidelock
|
OP

Sidelock
Joined: Dec 2019
Posts: 271 Likes: 20 |
Thought I would post a couple of photos of the checkering cradle I put together to work on this project. I bought the MTB wood cradle and I used RAM components as the articulated mounting support. Fully adjustable and solid when locked down. The spindle to hold a forend is courtesy of one displayed by Brian Dudley over on the PGCA forum. 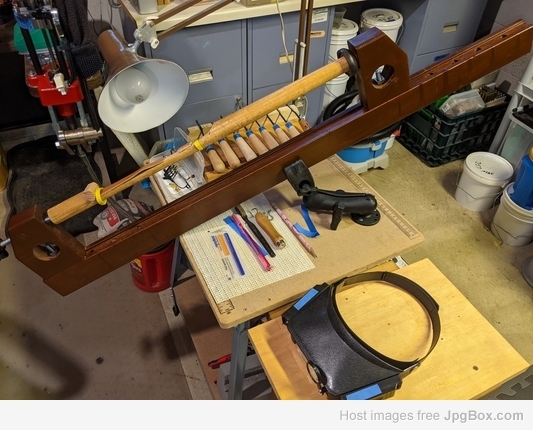 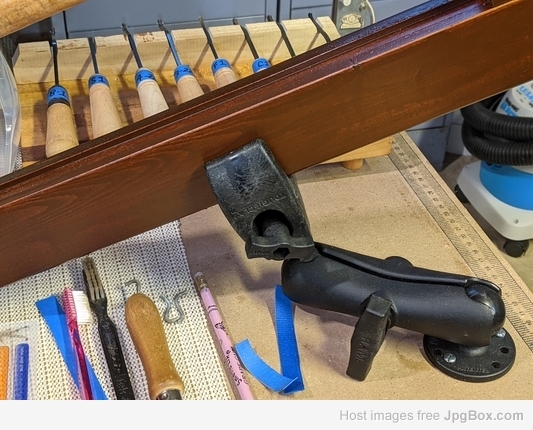 Practice on an orphan forend 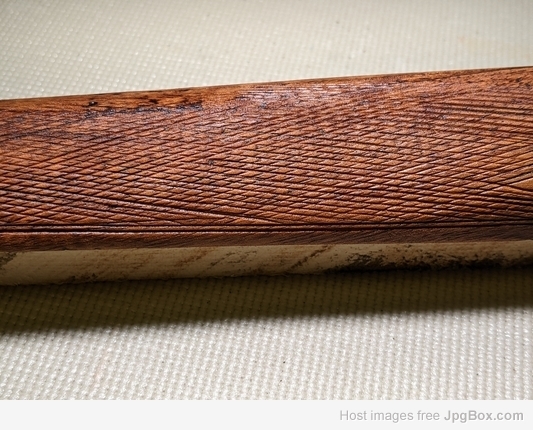
|
|
|
|
|
Joined: Dec 2019
Posts: 271 Likes: 20
Sidelock
|
OP

Sidelock
Joined: Dec 2019
Posts: 271 Likes: 20 |
Continuing with my project. My checkering tool experience.
For those interested in securing checkering tools this is what I have learned as I started out without a single checkering tool other than a couple of high quality rifflers or diesinker files. For checkering tools here is my experience. First, stay away from EBay for anything other than hard to find Dem-Bart NOS cutter bits. Sellers on Ebay and bidders must think these tools are scarce collector items. You will pay way too much. Second go to Jantz Knife Makers Supply in OK where you can purchase a Gunline Premier set for $150 or less. They also sell individual GL handles at $8 ( Ebay sellers will ask and get upwards of $40 for a single handle). Dem-Bart cutters will fit the Gunline handles. Brownell's see thru checkering handle is no longer available however you can get the same tool from Ullman Precision Products. These are more expensive and the cutter is sold separately. Handle and one cutter will cost $100. High quality if you are thinking of working on many projects. Ullman cutters @ $45 come in 90 and 75 degree and four different lengths so you really need to know what you need before buying.
Should anyone have additional information to share I and I am certain others would welcome any and all advice and suggestions. My thoughts are aimed at those who, like myself, want a few tools to use to freshen-up existing checkering and perhaps give one complete checkering job a try to pass the winter hours. High end checkering tools for the professional with carbide cutters are readily available.
|
|
|
|
|
Joined: Dec 2019
Posts: 271 Likes: 20
Sidelock
|
OP

Sidelock
Joined: Dec 2019
Posts: 271 Likes: 20 |
Finished working on matching the repair walnut piece color to the aged Parker forend walnut with an orange-brown solvent based wood dye. First time working with wood dye to blend in repair piece. I referenced Flexner and Jewitt on the application of wood dyes and my book - 600 Watercolors by S. Finmark to get the yellow-red-brown color mix. Next step is to apply the shellac finish and then finally recutting the checkering. 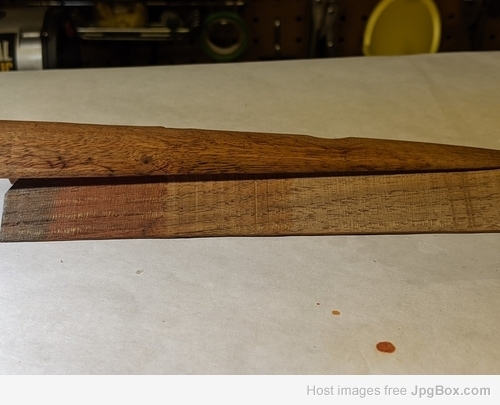
|
|
|
|
|
Joined: Dec 2019
Posts: 271 Likes: 20
Sidelock
|
OP

Sidelock
Joined: Dec 2019
Posts: 271 Likes: 20 |
Right up front please accept my thanks for the advice provided here. I appreciate the time spent to reply to my inquiries. Now to my current thoughts and questions. I am about to begin the processes of putting an orange shellac finish on my 1893 Parker GH forend. My goal is to create a finish that is close to the original as I am able to accomplish. To this end I have accomplished the following. Mixed my own shellac in the these cuts and colors: 1# Plantina, 2# Blonde, 1# Orange, 1# Garnet. These are ready to be used if needed. I have BLO available, but not raw LO. I have Japan Dryer available if needed. I have caster oil available if needed. After extensive reading I have decided that the technique of french polish is not required to apply the shellac. I will use a pad as in the french polish technique but will not be building up a gloss finish. Also, I will not be filling the pores in the walnut. I examined the wood on the Parker stock and the forend before starting the project and I see no evidence that filling the pores was part of the original wood finish process. I have read the two articles by Austin Hogan (thanks to Mike McKinney at the PGCA for getting the Parker Pages USB to me in a timely manner) and I have consulted my gunstock finishing library works by Newell, Dunlap, Mills and Barnes, Howe, and modern texts by Flexner, Jewitt, Dresdner and Allan and the excellent collected work by Woodreaux (DoubleGun forum). This is what I have gleaned to date. Hogan, through his experience as Parker collector and editor of the PGCA publication 'Parker Pages', along with material published in Chapter 10 of the Parker Story believes that a shellac finish was employed by Parker in finishing gun wood unless an oil finish was requested and only on higher grade Parkers. He does not provide any real details as to the exact process. I do not have a copy of The Parker Story and do not know the level of detail it contains. Newell recommends the addition of caster oil (non-drying oil) as a plasticizer to the shellac. A discussion on the Wood Web states that boiling raw linseed with shellac to produce a varnish, but this is not what I understand Parker would have used. A contributor to that discussion also states that mixing BLO and Shellac is not to be recommended. https://www.woodweb.com/knowledge_base/Shellac_and_Linseed_Oil_Finishes.html Mills and Barnes recommend the one-time application of raw linseed to the stock prior to the application of shellac. I see no evidence that the Parker wood was colored with linseed oil prior to application of shellac. Dunlap gives his favorite technique of applying BLO to the wood following by shellac immediately and the use of the hand rather than a pad. I do not think this to be applicable either. Howe has a strong distaste for "that orange shellac, colorless, dreadful, frightful looking, ... disfiguring looking finish" In a word awful, do not use. Flexner, Dresdner, Jewitt, discussing the application of shellac to wood finishing in general, each recommend mineral oil as a lubricant and not linseed oil. None recommends a direct mixing of linseed oil, raw or boiled, in any proportion with the shellac. Oil only as a padding lubricant. If you have direct experience with using shellac as a finish on a Parker (any gun wood) and not building up to a french polish technique finish and could provide a photo or two of the Parker wood I would be appreciative.
|
|
|
|
|
Joined: Feb 2008
Posts: 11,336 Likes: 388
Sidelock
|

Sidelock
Joined: Feb 2008
Posts: 11,336 Likes: 388 |
In your quest for an original type finish, always remember that much of what you will read in various gun forums or books is sheer conjecture. That is why you will get various "expert" opinions that differ wildly at times. In many cases, the factory records and methods have been lost to time, and these companies closed so long ago that there are no surviving employees who know or remember. And in the case of a gun company that was in business for decades, what they used in the 1880's may have been totally different than what they used 40 years later. I have read what supposedly constituted an original finish for Syracuse Lefevers on the Lefever forum, and believe it is total bullshit. But that is hardly the only misinformation to be found on gun collector websites.
As you have seen, the finish on most lower grade vintage shotguns was a drying oil or varnish type finish that was not built-up or intended to fill every pore. Also, old finishes that may have originally been smooth will shrink into the pores over time, and they tend to become darker as they oxidize. Some gun makers apparently used shellac. Sometimes, they used shellac as a cheaper filler base coat, and used something else as a top coat, because shellac is not the ideal surface finish for a field gun. It provides a hard scratch resistant finish, but it will easily spot from exposure to water, and it will chip and crack over time. Manufacturers used what was cheap and available, and as these were production line firearms, they were not treated to meticulous labor intensive hand rubbed multiple coats, and perfectly filled surfaces. BLO or linseed oil may have it's place in some original stock finishes, but it is a very poor choice as a stand-alone gun stock finish, even though some swear by it. Again, many gun makers used it because it was cheap and readily available.
I find it interesting where you say Newell added castor oil to shellac as a plasticizer. I'd presume that was to make it less prone to cracking. I kinda doubt that would do much to make shellac more water resistant.
The easiest way to know if a gun was finished with shellac is to wipe the surface with denatured alcohol. Shellac dissolves very easily in alcohol, and varnish does not. Of course, that would not be a great idea if it removed a good original finish on an original Parker, or any other gun. Several years ago, I was able to completely strip and clean a grungy, chipped, and scratched finish on a 16 gauge L.C. Smith field grade. I wiped on a coat of shellac as a sealer to even things out, and top coated with a varnish.
About that same time frame, I picked up a very nice Baker Batavia Leader 12 gauge at a gun show. The blue and case colors were very strong, but the stocks looked horrendous. They were dark and looked like an alligator hide. I immediately knew that someone had applied a fairly heavy coat of shellac, and I was able to buy it very cheap because of how ugly the wood was. It took very little time and effort to completely remove the shellac that had been applied, and thankfully, the original finish remained, and was still in very nice condition. I saw the very same thing with a Lefever G Grade that I bought on Gunbroker. The stock was as ugly as a mud fence in the photos, so it sold very cheap. I was able to make it very presentable, and preserve the original finish underneath, for about a dollars worth of denatured alcohol, and an hour or so of time. That one even had shellac slopped on the metal and buttplate, and a little alcohol easily removed that as well. Sometimes you get lucky.
I admire your desire to refinish your gun using materials and techniques as near as possible to the original finish. But I am not a Parker collector and only have a few Parker doubles, and an 0 frame stock set. I could well be wrong, but none of them look like shellac finishes to me. And sorry, but I don't have any reason to slop on some alcohol to find out for certain. If you had a definite original Parker stock, you could give a chip of finish to someone in a good crime lab, and they could run it through an NMR spectroscopy test, and perhaps tell you exactly what you have. But even then, they would need something to compare the results to. Another caution is that a helluva lot of Parker shotguns that are said to be all original are not. However, if I was going to refinish one of them, I do not think I would choose shellac as a top coat on any gun I planned to use for hunting, knowing what I know about shellac. Just something to think about, even if not what you wanted to know.
EDIT: I see BrentD reading my post again, when he claims to IGNORE my posts. I wish it worked the other way, so I could block him from reading what I post. I hate possibly providing info to someone who voted for Joe Biden.
A true sign of mental illness is any gun owner who would vote for an Anti-Gunner like Joe Biden.
|
|
|
|
|
Joined: Dec 2019
Posts: 271 Likes: 20
Sidelock
|
OP

Sidelock
Joined: Dec 2019
Posts: 271 Likes: 20 |
Keith, thanks for the reply. I always learn quite a lot whenever I take on one of these project guns. Your comments are always helpful and give me grist to chew on (my completed Lefever G as example). I am not a collector, although my wife would say otherwise. I have only one Parker, this GH.
For this Parker I am working only on the forend with the aim to recut the smoothed out checkering and get a finish that is not inconsistent in color and feel with that on the stock. (I may do the stock after I judge my success with the forend). Close examination of the stock does suggest shellac as I can find one very small spot (maybe 1mm) at a junction of the pad and heel where a small chip, only present in the finish, is present. My experience is that as finishes go, shellac chips, oil wears. I am also of the opinion that the original finish has received a neutral colored top coat, very thin, perhaps a thinned BLO with dryer, but on there nevertheless. What do I base this on you ask (or not)? The stock finish is satin luster, with somewhat filled but still open pores and I can see this finish in the checkering cuts. I believe shellac at 119 years would or should look quite dry and the checkering cuts should not have a deposit of finish. (On the stock checkering I may try to use alcohol and a suede brass brush and see if whatever is there will dissolve. If yes == shellac, no == ??). If shellac I can always re-coat the checkering with a 1# cut of blonde or orange.
At the moment I am working with an alkanet (to get a reddish tint) and orange or garnet shellac finish (on a practice forend of approximately the same 100 year age).
Should you know of anyone with a copy of the very pricey book 'The Parker Story', I would like to converse. My understanding is that Chapter 10 concerns the Parker stock making and finishing process. How much useful finishing detail there is in this material I do not know but would like to find out.
I also will be trying the use of caster oil described by Newell in his 1949 book on Gunstock Finishing and Care. He recommends a 4% (4ml to 96ml) caster oil to shellac. On my practice piece of course.
As a final top coat I may use a neutral wiping varnish to provide some additional resilience in the field. My guns have to earn their keep. In the Ohio woodcock coverts, full of multiflora rose, thorn-apples, wild grape, and prickly Hawthorne, a wood finish has to be resilient. No safe queens or gun show "look at me" babes allowed here.
|
|
|
|
|
Joined: Nov 2012
Posts: 122
Sidelock
|

Sidelock
Joined: Nov 2012
Posts: 122 |
One of the tools I did not see in the photo of your work space that I highly recommend for those lines that go astray no matter what you do. I have used it on every job. https://www.brownells.com/gunsmith-tools...r--prod604.aspx
|
|
|
|
|
Joined: Dec 2019
Posts: 271 Likes: 20
Sidelock
|
OP

Sidelock
Joined: Dec 2019
Posts: 271 Likes: 20 |
Larry, thanks. Just ordered one from Brownell's. Really appreciate your help.
|
|
|
|
|
Joined: Dec 2019
Posts: 271 Likes: 20
Sidelock
|
OP

Sidelock
Joined: Dec 2019
Posts: 271 Likes: 20 |
I believe I have achieved the reddish color tone match using the alkanet red oil. Practice wood from the same period 1890's above with three applications, original Parker stock finish below. I tried BLO as the first application on the other side of the forend and that produced a color tone with too much brown and very little red tones. 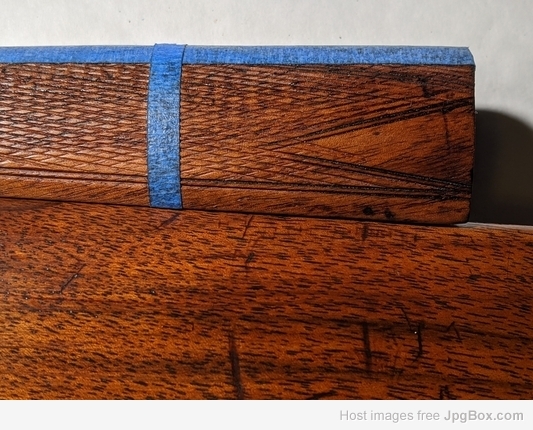
|
|
|
|
|
Joined: Sep 2016
Posts: 404 Likes: 29
Sidelock
|

Sidelock
Joined: Sep 2016
Posts: 404 Likes: 29 |
that looks like a great match. looking forward to seeing the final product
Jim
|
|
|
|
|
Joined: Dec 2019
Posts: 271 Likes: 20
Sidelock
|
OP

Sidelock
Joined: Dec 2019
Posts: 271 Likes: 20 |
I need some advice. As I make progress on my recutting of the checkering I have arrived at working on the mullered border. The first photo shows the original border with very little wear on the right. I have re-established the border on the left. The original border on the left consisted of a slight amount of original pattern in the form of lines and a slight border profile. The second photo shows the tools I have for this work. The Dem-Bart cutters are 1) 2-28, 2) BC-N concave, 3) F1, and 4) 4-40 machine screw tool. And a curved blade knife. As I continue along the checkering pattern I will be losing any pattern lines for the border as it has been completely erased by hand wear. This will make re-establishing the border more difficult. I watched a YouTube video (MNR Custom, LLC) on this type of border and the fellow uses a 28 lpi cutter to establish the border lines for the mullered border (on a 22 lpi checkering pattern and not a Parker). A couple of observations at this point. 1: the Dem-Bart BC-N cutter seems to be too wide to match the original border. Is the Gun line concave cutter narrower? 2: there are two lines, one on each side of the border, very thin. How are these cut? Which tool? 3: I find that a 2-28 cutter will give me the required center line for the border. Is this a good means to center the border? I am thinking of using the 2-28 cutter twice to establish the inner and outer border lines. ![[Linked Image from jpgbox.com]](https://www.jpgbox.com/jpg/62216_600x400.jpg) ![[Linked Image from jpgbox.com]](https://www.jpgbox.com/jpg/62217_600x400.jpg)
|
|
|
|
|
Joined: Dec 2019
Posts: 271 Likes: 20
Sidelock
|
OP

Sidelock
Joined: Dec 2019
Posts: 271 Likes: 20 |
For those interested, and following here are a couple of photos on my progress. The original border on this Parker is only +0.070 wide measured from thin outside border line to opposite border line. This is a 28 lpi pattern. The actual mullered border is even narrower. This photo shows the worn smooth border on the left: ![[Linked Image from jpgbox.com]](https://www.jpgbox.com/jpg/62270_600x400.jpg) This photo shows my refurbished border on the right: ![[Linked Image from jpgbox.com]](https://www.jpgbox.com/jpg/62272_600x400.jpg) A few more lines to go. I need new eyes.
|
|
|
|
|
Joined: Dec 2001
Posts: 6,991 Likes: 402
Sidelock
|

Sidelock
Joined: Dec 2001
Posts: 6,991 Likes: 402 |
Are you using magnification? I need an opti-visor for that kind of work these days. I spent this afternoon cutting metal checkering....my eyes are darn tired afterward.
|
|
1 member likes this:
LetFly |
|
|
|
|
Joined: Dec 2019
Posts: 271 Likes: 20
Sidelock
|
OP

Sidelock
Joined: Dec 2019
Posts: 271 Likes: 20 |
Parker mullered border progress. Center two short sections on left remain to be added. Left side, knuckle end. Original completely obliterated by wear. ![[Linked Image from jpgbox.com]](https://www.jpgbox.com/jpg/62377_600x400.jpg)
|
|
|
|
|
Joined: Dec 2019
Posts: 271 Likes: 20
Sidelock
|
OP

Sidelock
Joined: Dec 2019
Posts: 271 Likes: 20 |
Checkering recut with mullered border. Work remains on relief around forend latch and finishing up lines along the inside border. ![[Linked Image from jpgbox.com]](https://www.jpgbox.com/jpg/62392_600x400.jpg) ![[Linked Image from jpgbox.com]](https://www.jpgbox.com/jpg/62402_600x400.jpg)
Last edited by LetFly; 01/26/21 09:51 PM.
|
|
|
|
|
Joined: Mar 2019
Posts: 109
Sidelock
|

Sidelock
Joined: Mar 2019
Posts: 109 |
LetFly
I enjoy following your progress. What do you plan on doing with the metal?
|
|
|
|
|
Joined: Dec 2019
Posts: 271 Likes: 20
Sidelock
|
OP

Sidelock
Joined: Dec 2019
Posts: 271 Likes: 20 |
82nd Trooper, thanks. Metal surfaces are in decent condition so I will be leaving the metal as is with the exception of barrels. I am having these refinish black/white by Lou Rotelli. He produced excellent results on my Lefever G project from last year. Finished wood project on 1893 Parker G 12b. ![[Linked Image from jpgbox.com]](https://www.jpgbox.com/jpg/62462_600x400.jpg)
Last edited by LetFly; 01/31/21 11:19 PM.
|
|
1 member likes this:
Stanton Hillis |
|
|
|
|
Joined: Mar 2019
Posts: 109
Sidelock
|

Sidelock
Joined: Mar 2019
Posts: 109 |
Any progress reports or pics of the barrels?
|
|
|
|
|
Joined: Dec 2019
Posts: 271 Likes: 20
Sidelock
|
OP

Sidelock
Joined: Dec 2019
Posts: 271 Likes: 20 |
Barrels should be back from Lou Rotelli around first of April. Thanks for following along.
|
|
|
|
|
Joined: Dec 2019
Posts: 271 Likes: 20
Sidelock
|
OP

Sidelock
Joined: Dec 2019
Posts: 271 Likes: 20 |
After a long, cold winter followed by a hot-cold-hot-wet spring then the same for summer here in central Ohio, my 1893 Parker GH project is now completed. The barrels are back home, looking top-shelf fantastic, reunited with the recheckered fore-end, mullered border, all lines recut with fresh shellac, and the cleaned stock/receiver. This was a fun project and now it's back in the safe until autumn. Barrel refinishing work by Louis Rotelli, Classical Restoration. Lou does fantastic work, using only hand polishing to preserve all engraving. This is the second barrel set Lou has done for me, the first being my 1895 Lefever G.(Stock repair, Yikes, this forum). I could not be more pleased with Lou's work. Take a look at the beautiful D grade Damascus pattern on these tubes. Here are a few photos to close out this thread. ![[Linked Image from jpgbox.com]](https://www.jpgbox.com/jpg/63964_600x400.jpg) ![[Linked Image from jpgbox.com]](https://www.jpgbox.com/jpg/63963_600x400.jpg) ![[Linked Image from jpgbox.com]](https://www.jpgbox.com/jpg/63965_600x400.jpg) ![[Linked Image from jpgbox.com]](https://www.jpgbox.com/jpg/63966_600x400.jpg) ![[Linked Image from jpgbox.com]](https://www.jpgbox.com/jpg/63967_600x400.jpg) ![[Linked Image from jpgbox.com]](https://www.jpgbox.com/jpg/63970_600x400.jpg) Pheasants starting in September and woodcock in November await. Quail to follow next April. To all who helped with advice and encouraging comments along the journey, my hearty thank you.
Last edited by LetFly; 07/15/21 08:33 PM.
|
|
|
|
|
Joined: Jan 2009
Posts: 767 Likes: 19
Sidelock
|

Sidelock
Joined: Jan 2009
Posts: 767 Likes: 19 |
|
|
|
|
|
Joined: Apr 2016
Posts: 822 Likes: 34
Sidelock
|

Sidelock
Joined: Apr 2016
Posts: 822 Likes: 34 |
|
|
|
|
|