|
S |
M |
T |
W |
T |
F |
S |
|
|
1
|
2
|
3
|
4
|
5
|
6
|
|
7
|
8
|
9
|
10
|
11
|
12
|
13
|
|
14
|
15
|
16
|
17
|
18
|
19
|
20
|
|
21
|
22
|
23
|
24
|
25
|
26
|
27
|
|
28
|
29
|
30
|
|
|
|
|
|
|
Forums10
Topics38,463
Posts545,036
Members14,409
| |
Most Online1,258
Mar 29th, 2024
|
|
|
|
Joined: Mar 2005
Posts: 157 Likes: 2
Sidelock
|
OP

Sidelock
Joined: Mar 2005
Posts: 157 Likes: 2 |
Hi All, looking for some guidance on how to address a loosening pin in a stock.��Appears that this stock developed an internal crack a long time ago and someone pinned the stock.��Well that fix lasted a long time.��But now seems that the pin has let go a bit. So, I�d like to tackle rectifying the issue again.��This will be my first attempt at work like this.��I obtained this gun knowing that I need to put some elbow grease into it.��And knowing this will be my first time working on a gun in this manner.��It�s not a high value gun and I�d like to get some experience in this. Please see the pic(s) for reference. Anyone have ideas on if should add more pins?��Replace the existing pin with a larger pin?��Other thoughts? Or can you point me to a video or instructions online?��My cursory search didn�t turn up much. Thanks! And....this won�t be an heirloom. I�d like it to be functional. For what I got the gun for it�s not worth it to me to send it out to a pro....it really was meant for me to learn some basic restoration items. Like fixing this stock, refinish the stock, tearing apart the action cleaning/oiling/greasing, removing rust from barrels, re-blueing, etc...it�ll either be a learning experience for me (I love to get my hands dirty) or if I screw it up...a wall hanger... 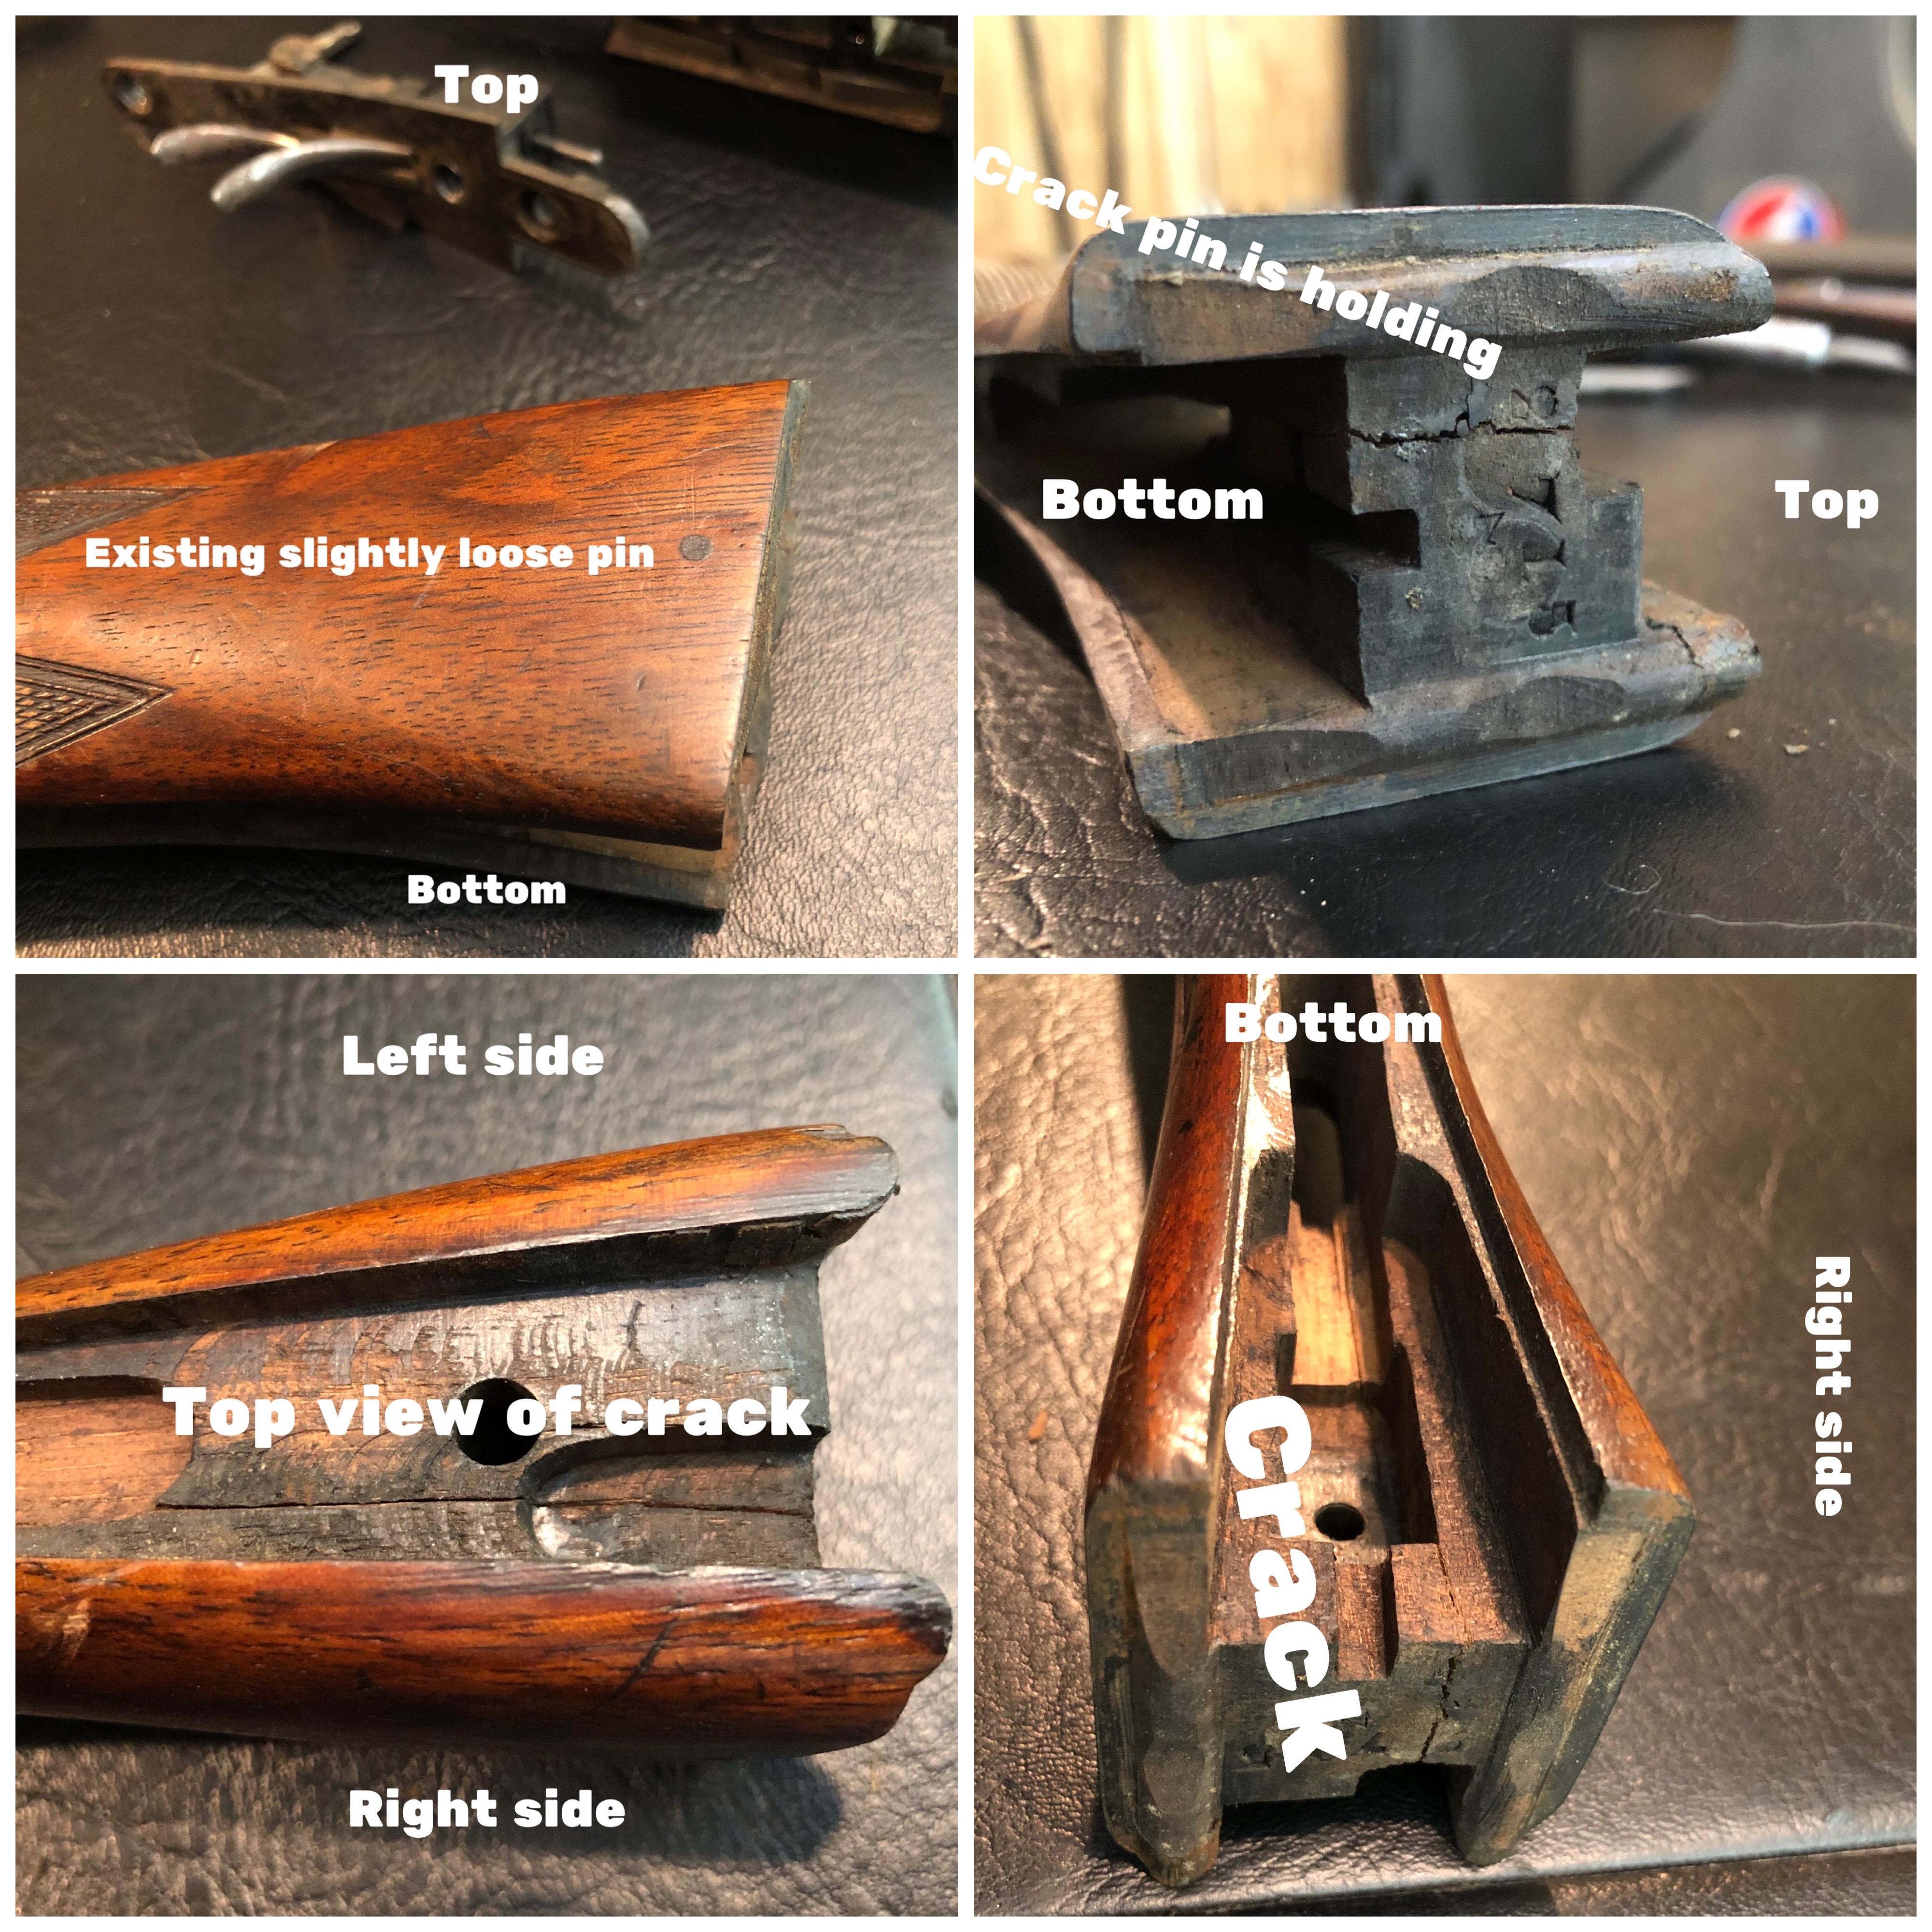  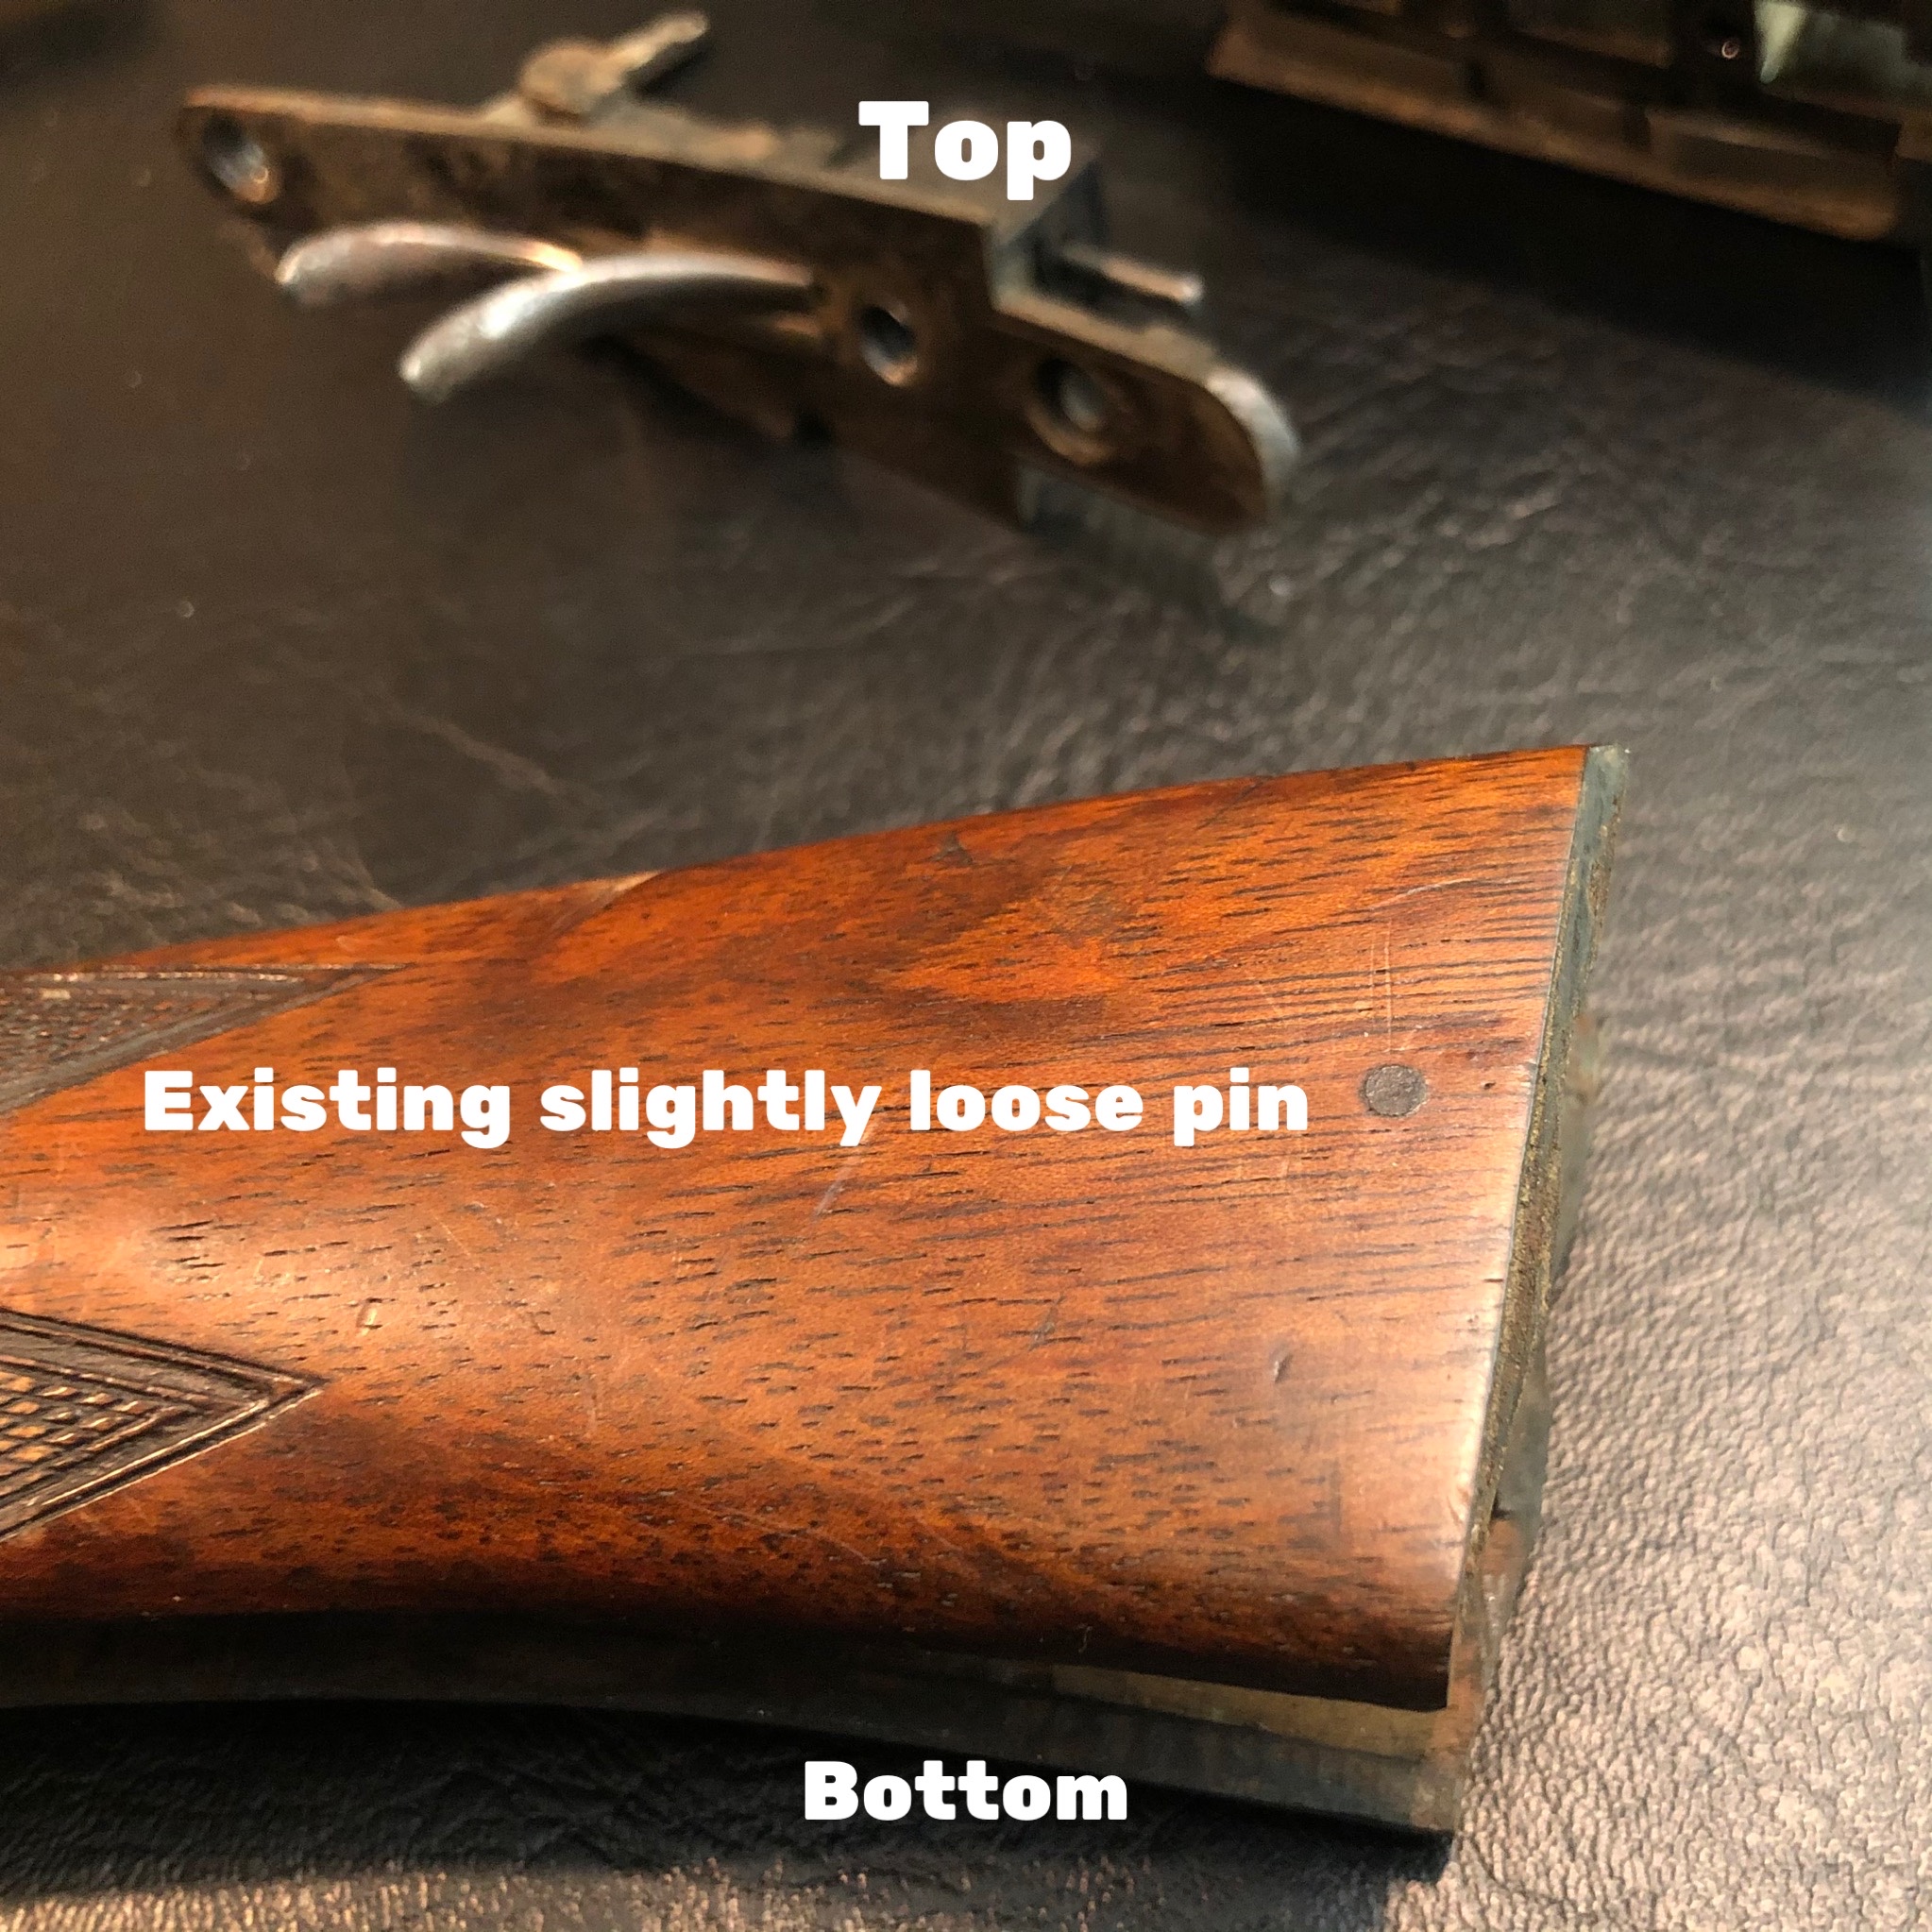  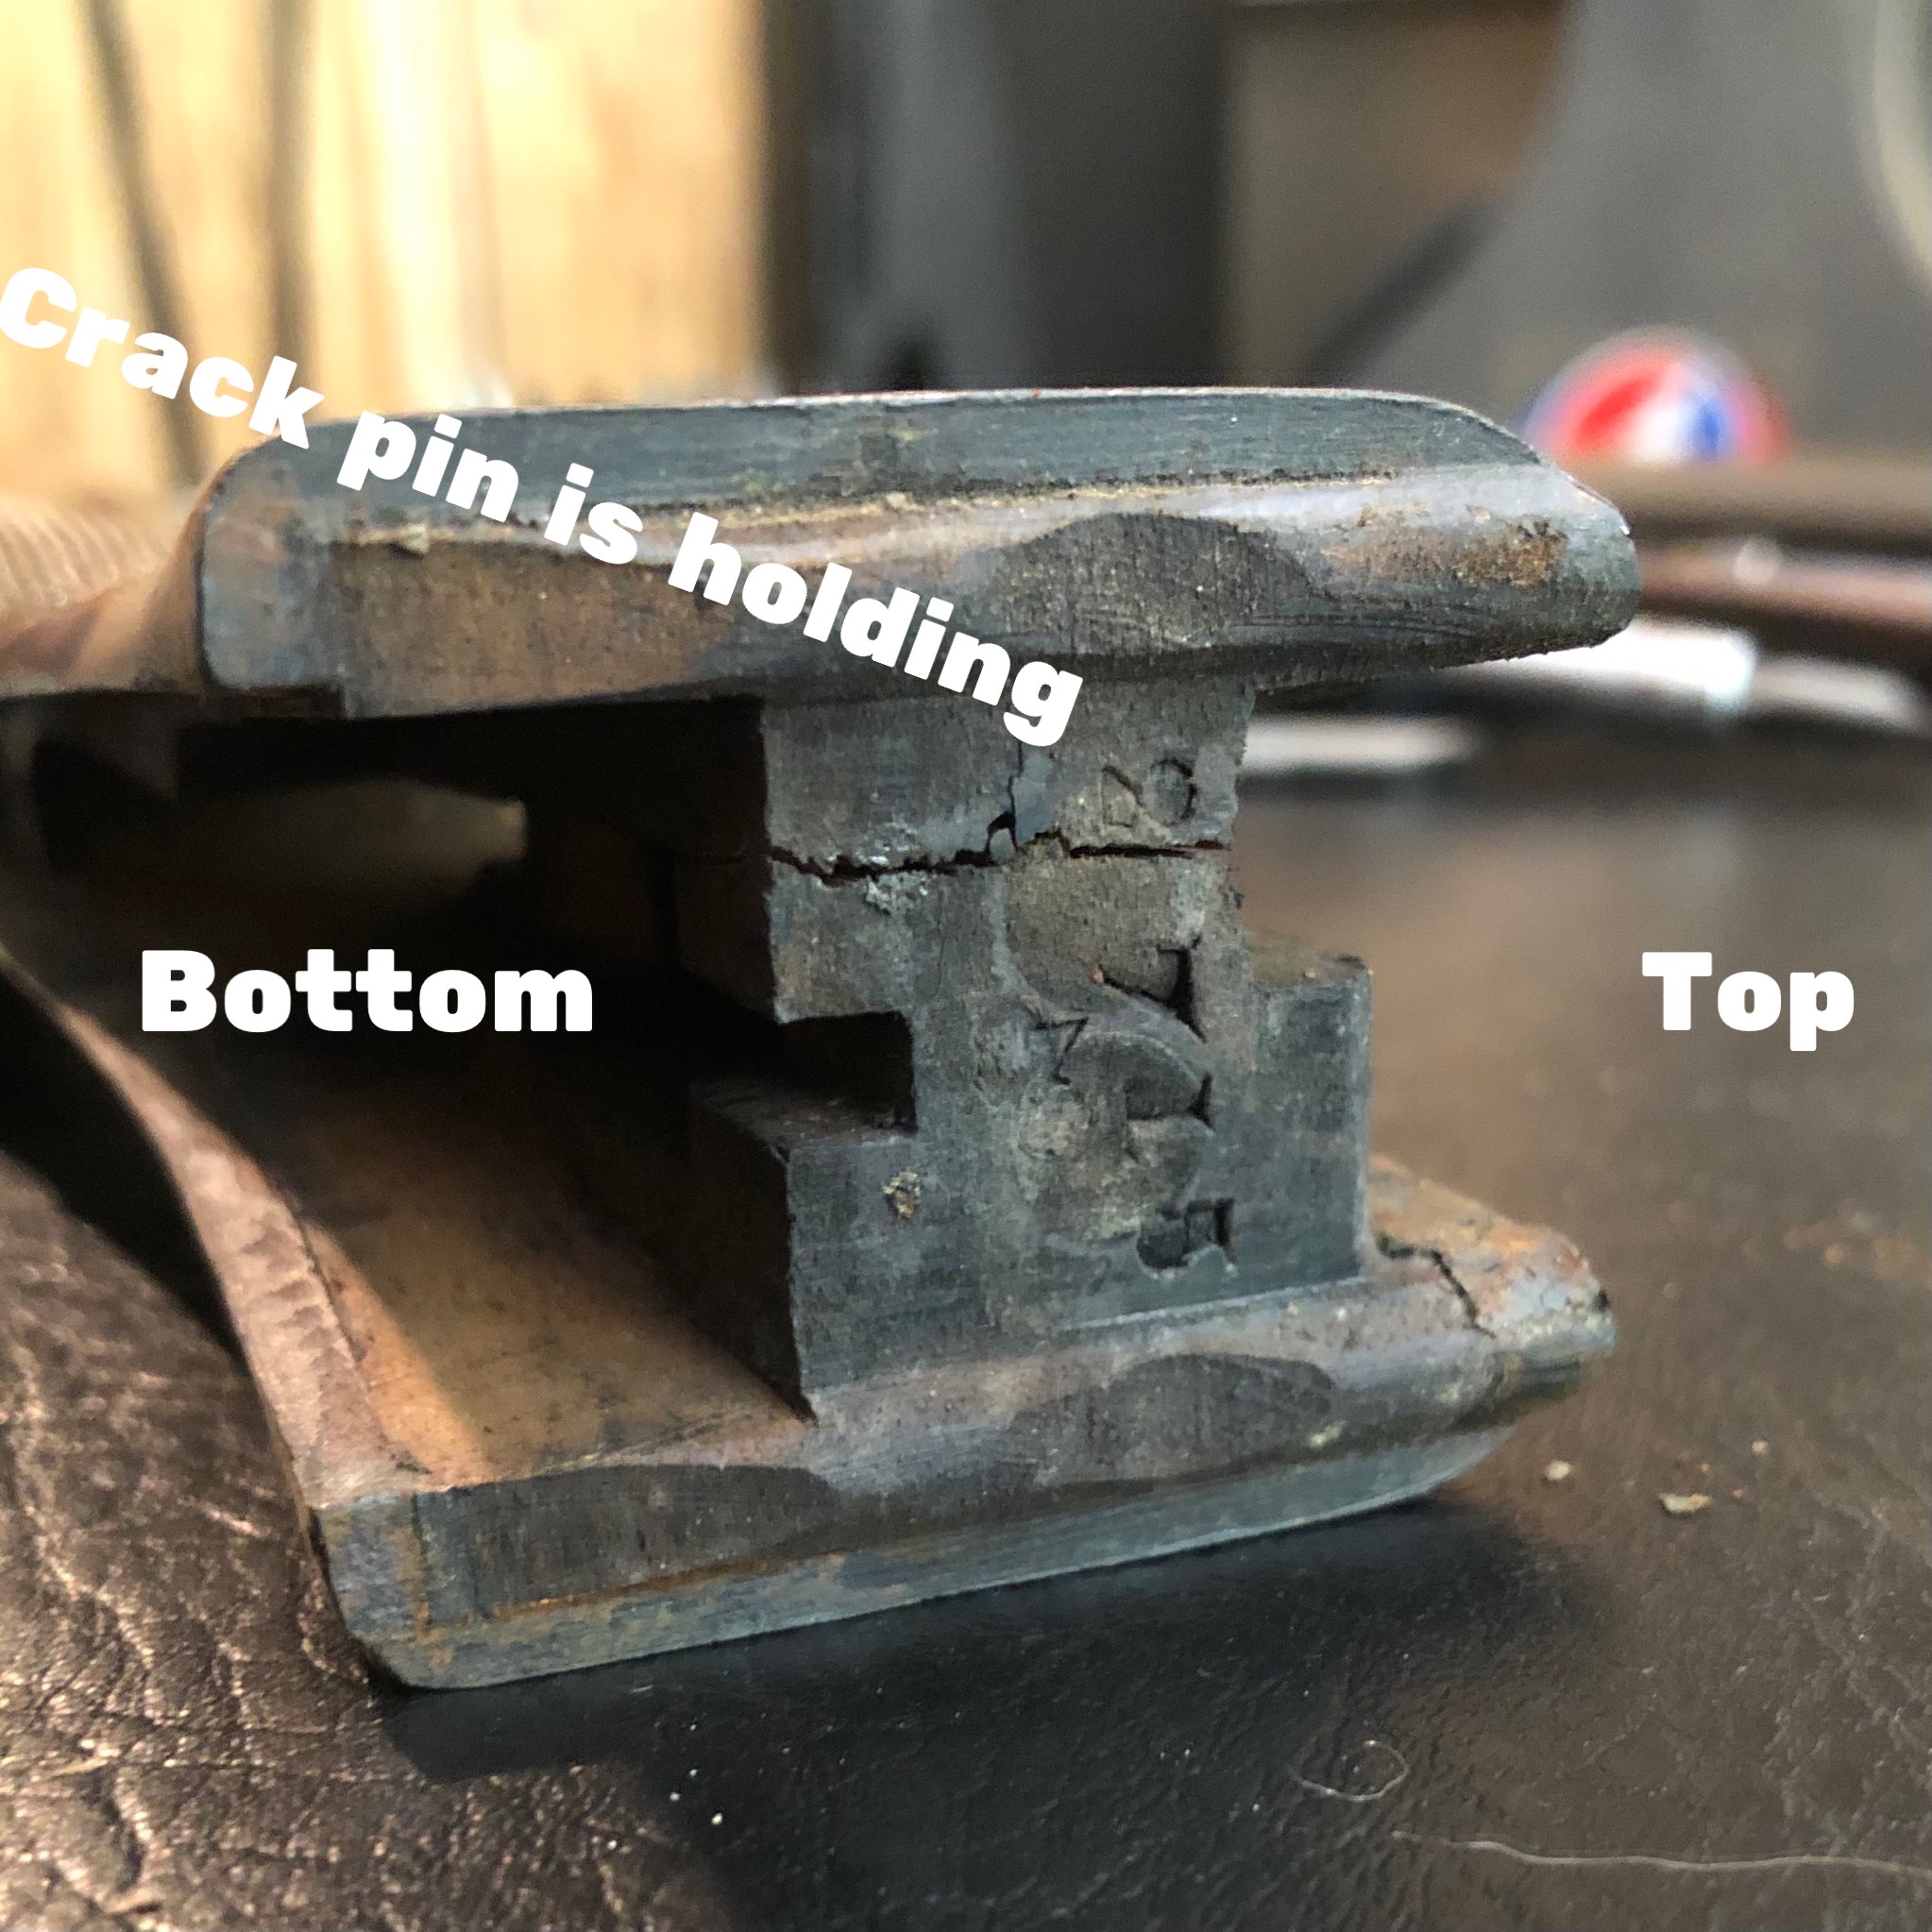 
Last edited by fishrising; 11/12/20 05:55 PM.
|
|
|
|
|
Joined: Jan 2002
Posts: 13,149 Likes: 1147
Sidelock
|
|
Sidelock
Joined: Jan 2002
Posts: 13,149 Likes: 1147 |
The most accepted, and invisible when gun is assembled, way to permanently repair this is by using a metal staple and epoxy. Rather than try to explain the process I would suggest you do a search for something like "stock staple repair". There have been threads on various shotgun forums showing this repair with pics. Several on the Pahkah site, AIR.
SRH
May God bless America and those who defend her.
|
|
|
|
|
Joined: Jul 2008
Posts: 448 Likes: 4
Sidelock
|
|
Sidelock
Joined: Jul 2008
Posts: 448 Likes: 4 |
|
|
|
|
|
Joined: Jan 2013
Posts: 1,124 Likes: 195
Sidelock
|
|
Sidelock
Joined: Jan 2013
Posts: 1,124 Likes: 195 |
This is the most common type of crack and place you find it. Being so common it is quite a straight forward process, except for the pin that I cant see if it is wood or metal. To start this is the way I would tackle it but if you ask a dozen other people you will come up with twelve other methods. The first thing I would do is to remove that pin if it is at all possible and not making any more damage in the process. Next clean out the crack using a spirit Acetone etc. or Alcohol, you will also need some adhesive my preferred is slow set epoxy, dental floss. Bicycle inertube, Brass or Stainless Steel to make pins and staple's .Not totally necessary but it is the only thing I have found to successfully clean out cracks and make the passage of the adhesive and dental floss through the crack is a "Piercing saw blade.  When you have cleaned the crack out as far as you can go the dental floss comes in to its own now for pulling the adhesive into the crack as far as it will go, the reason for slow set epoxy now becomes obvious so take tour time. Now using strips of innertube bind the crack tightly so it closes.  After the epoxy has set clean up the wood and fit staples across the crack as in the photograph, the size ant type you use is dictated by where you can fit them without interfering with the guns working. As for that pin, if you removed it I would replace it with a metal one but remember to file a small groove along its length to allow the adhesive to exit and not build up pressure. My personal choice would be to end the pin a little below the surface and steal a sliver of wood from inside the stocks head that will match in colour and grain then glue into the recess that you left over the pin then sand level with the stocks surface. Hope this is of some help. damascus
The only lessons in my life I truly did learn from where the ones I paid for!
|
|
|
|
|
Joined: Mar 2005
Posts: 157 Likes: 2
Sidelock
|
|
OP
Sidelock
Joined: Mar 2005
Posts: 157 Likes: 2 |
|
|
|
|
|
Joined: Mar 2019
Posts: 109
Sidelock
|
|
Sidelock
Joined: Mar 2019
Posts: 109 |
Very informative and nice tricks of the trade Damascus.
|
|
|
|
|
Joined: Jan 2004
Posts: 6,711 Likes: 411
Sidelock
|
|
Sidelock
Joined: Jan 2004
Posts: 6,711 Likes: 411 |
_________ BrentD, (Professor - just for Stan) ![[Linked Image from i.imgur.com]](https://i.imgur.com/qclHjMQ.jpg)
|
|
|
|
|
Joined: Jan 2013
Posts: 1,124 Likes: 195
Sidelock
|
|
Sidelock
Joined: Jan 2013
Posts: 1,124 Likes: 195 |
Because I have done this repair more times than I can remember some things become so automatic that I never think of as important and I have left very simple but important steps out.
To make things a lot easier you should open the crack without making things worse, this is done in two stages, firstly at the full extent of the cracks travel bind the stock in inertube strips to prevent further travel while you are working on the stock. Secondly on the open end of the crack tap in a hobby knife blade to open the crack failing one blade you can add others to improve things, please remember you are not making the Grand Canyon . Though in a lot of cases the need for a stop binding not necessary, Though one thing I have always done after a split repair if I can is at the end of the crack I drill a 1mm hole to put a stop the cracks progress.
I do hope that some of you folks have noted down some of Damascus's tips, because my time on this forum is now on a countdown.
|
|
|
|
|
Joined: Feb 2009
Posts: 7,463 Likes: 212
Sidelock
|
|
Sidelock
Joined: Feb 2009
Posts: 7,463 Likes: 212 |
|
|
|
|
|
Joined: Dec 2001
Posts: 3,964 Likes: 89
Sidelock
|
|
Sidelock
Joined: Dec 2001
Posts: 3,964 Likes: 89 |
Sure hope you�re not planning an exit from the forum soon, Damascus! I never miss a post of yours�always great information and we all thank you! God bless!
When an old man dies a library burns to the ground. (Old African proverb)
|
|
|
|
|
Joined: Sep 2016
Posts: 404 Likes: 29
Sidelock
|
|
Sidelock
Joined: Sep 2016
Posts: 404 Likes: 29 |
add me to the list of those who greatly appreciate the posts from Damascus.
Jim
|
|
|
|
|
Joined: Mar 2012
Posts: 347 Likes: 5
Sidelock
|
|
Sidelock
Joined: Mar 2012
Posts: 347 Likes: 5 |
I would suggest unwaxed dental floss would be best to use.
Sam Welch
|
|
|
|
|
Joined: Feb 2002
Posts: 1,850 Likes: 150
Sidelock
|
|
Sidelock
Joined: Feb 2002
Posts: 1,850 Likes: 150 |
Depending on the extent of the crack, I sometimes spread the wood apart to allow the epoxy to get down into the crack easier.
A thin bladed screwdriver inserted from the front/head of the stock is the usual method if that's where the damage starts as in this case (though the pics seem to have disappeared on the OP's post).
If the crack extends far back thru the inletting and even to the rear tang screw area (I think it may in this instance),,I will take a coping saw and slice thru the crack from the front.
Then saw straight to the back of the inletting following the crack s best I can. But stopping before sawing outside of the inletting.
(That pin in the OP's stock most likely runs across the crack now showing. If it does, saw through it & take a chunk out of it with a jewelers saw or hack saw before trying to cut through with a wood cutting blade on a coping saw.)
All this to relieve the cracked wood of any fibers attached inbetween and clean out old wood that may have become contaminated over time.
It also allows some space for the epoxy glue that's coming plus some allowance for easily clamping the sides tight against the frame of the action when gluing it up.
At the head I usually place a Dumbell reinforcement.
Simply a small machine screw with a nut on the other end.
The screw head on one end and the nut on the other form the reinforceing ends betw the threaded shaft of the screw.
Clip the screw to length after running the nut to an appropriate length needed to fit down into the head of the stock.
Mark the position and cut out an inlet for the screw and nut reinforcement in the head of the stock.
Nothing fancy needed.
Enough depth to bury it in epoxy, positioned in such a way so as not in interfere with any moving parts of course and placed within the confines on the exterior dimensions so as not to show on the outside but still take advantage of all the strength of the wood as possible in holding the head of the stock together.
Where a screw and nut assembly doesn't fit in, I simply use a finishing nail and bend it into a Staple shape with a pliers.
It works the same way buried into an inlet in the head of the stock.
I sometimes add an additional smaller staple in the wood under the top tang area across a crack repair if it's an area acceptable to one.
Do the epoxy repair of the crack and the staple(s) at the same time as well as having the assembled action placed in the stock and screwed down in place.
Put release agent on the metal & action screws so you don't end up with a one piece assembly.
In doing so you can clamp the sides of the stock up at the frame & pull them inward to a nice fit once again against the tangs.
When the epoxy cures, the stock will be set in that position and strengthened by the repair of the crack(s) and the addition of the reinforcement staples.
I often go back after the above process is done and further 'glass bed' some areas of the stock that may need help in supporting the wood against recoil.
Nothing says you have to do the entire job in one pass.
After everything is done give the whole epoxy job a few days to cure before 'live fire'.
There really is a difference in the strength of the stuff after a few days of cure time.
...Damascus,,I always take notes! We can always learn.
|
|
|
|
|
Joined: Jan 2002
Posts: 13,149 Likes: 1147
Sidelock
|
|
Sidelock
Joined: Jan 2002
Posts: 13,149 Likes: 1147 |
...Damascus,,I always take notes! We can always learn. Me, too. Both of you are great resources to this forum. Here's hoping ya'll stick around a long time. Thank you both very much. SRH
May God bless America and those who defend her.
|
|
|
|
|
Joined: Mar 2005
Posts: 46
Sidelock
|
|
Sidelock
Joined: Mar 2005
Posts: 46 |
Some BSA's, like the one pictured, were pinned by the factory when manufactured.
Bob
|
|
|
|
|
Joined: Mar 2019
Posts: 109
Sidelock
|
|
Sidelock
Joined: Mar 2019
Posts: 109 |
Great post Kutter.
Damascus-I'll continue taking notes.
|
|
|
|
|
Joined: May 2004
Posts: 2,091 Likes: 13
Sidelock
|
|
Sidelock
Joined: May 2004
Posts: 2,091 Likes: 13 |
Add me to the list of those who greatly appreciate the posts from Kutter.
So many guns, so little time!
|
|
|
|
|
